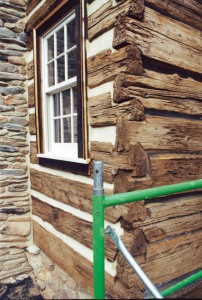
Here’s a great photo that shows the steps in properly chinking a log cabin, and what the finish result should look like.
On the right side, if you look close enough, you will see that we have installed the diamond mesh metal lathing. It is now ready for a layer of cement to be troweled on.
On the left side you can see that we have smoothly troweled on the mud leaving no mess on the log, nor have we chinking the corners… which so many do… which just looks terrible.
We use a special type of cement known as Flamingo C-74…. We DO NOT use permachink. I do not like to use plastic products, nor do I trust that they will hold up over time as well as much cheaper and more attractive natural products.
The most critical part of the chinking is how the chinking runs out flush to the log on the bottom, but is recessed at the top of each course of chinking. If the chinking is not applied like this water will get in behind the logs and rot out them out.
Improper chinking by others is the number one call I get from log cabin owners. The process of extracting poorly installed chinking and applying it correctly is not enjoyable, nor is it inexpensive.
It pays to do the job right the first time.
Originally posted 2015-06-12 13:40:21.

