The Madison House… part 15
Have you ever noticed how some people do not feel as if they have fully parked until they dock to something? It’s as if everyone is under some delusion that they are driving a boat and not a car. Most peculiar.
I swear I can’t go anywhere in town it seems without witnessing someone scrape the front of their car and bounce off one those concrete stops found in parking lots. It must give them a sense of completion… “I have arrived!”
It’s really odd.
Well, I had a similar problem here at the Madison House. Visitors to our home, or delivery drivers dropping off a package, would drive up past the end of the gravel driveway, nearly all the way up to the porch, as if it we were some kind of drive-through place of business.
What is wrong with people? Is this the result of excess fast food consumption? or perhaps excess pharmaceutical usage?
So, I planted shrubs and trees and they would try to dock to them! … sometimes running them over! The poor things.
Then, I put up a little picket fence and prayed that folks would stop short of hitting it. I put pointy little spikes on top of each picket to signal danger ahead.
It worked!
Maybe… they should put picket fences in parking lots?
Originally posted 2015-03-27 15:21:18.
The Madison House… part 14
One of the many attributes of a stone wall is that they will create a whole new active environment. The addition of a dry laid stone wall to the landscape creates many new places where small creatures can “hide and reside”.
It can bring a yard to life.
That can be a good thing if you get cute little furry chipmunks. Or a bad thing, if you get mice and snakes. It’s a good idea if you live in the country, with a stone wall, to have good cat to keep things “in balance”.
This is Woody, who is paying more attention to the sounds in the wall that he hears rather than to some nosy photographer.
Originally posted 2015-03-27 14:38:41.
The Madison House… part 13
Do you want to know what the worst thing is about building your own home?
Well, it’s the fact that you don’t have a whipping boy. There is no one there to blame when things go wrong, no one to fuss at about how the budget has been blown, no one to whine too about how much something costs.
That’s part of the job of being a builder it seems, to be the whipping boy for the clients. It might as well be in the contract. Over time builders become thankful when it’s just a whine that they hear and not a scream. lol
So, when you build your own home you learn to take on responsibility for those inevitable unforeseen challenges. And to not burden others with problems that are not of their doing. I guess that’s a good thing? Maybe everyone should consider building their own home?
Building on a steep site presents extra challenges, and expenses. If you go into a project like this knowing that setbacks are “part of the package” and have the goal of making the best out of these problems, they can turn out to be a treasures in disguise.
And that’s what this retaining wall became.
There are a LOT of stones in this wall. And, no cement. Some of the stones are the size of a refrigerator, and weigh as much as a car.
This stone wall added so much more than just extra square footage to our tiny yard. Don’t you think?
Originally posted 2015-03-27 14:14:40.
The Madison House… part 12
I always enjoy seeing the creativity that goes into making a scaffolding for the masons to work off of.
Here they are making the final touches to the top of the chimney.
This chimney would provide flues for two fireplaces, one in the first floor cabin and one in the second story master bedroom… also there was flue for a woodstove in the main family room.
Originally posted 2015-03-26 21:29:10.
What’s wrong with this cabin?
Pop Quiz today!
Can you spot the twelve mistakes that the builder of this log cabin made?
Here are images of two log cabins, the one above was built by someone unknown to me, the other, seen below for comparison, is a cabin that I built.
I’m not pointing out these flaws to insult the other builder, nor to make myself look better. I’m just trying to share what I’ve learned over the years while trying to build at the highest level of aesthetics, authenticity, and quality that I could achieve.
All of these changes that I would have made, when combined, would have likely only cost the cabin’s owner a few hundred dollars more and in my opinion would have made the cabin so much better. One these errors that the builder made will eventually prove very costly for the cabin’s owner and could easily shorten the cabin’s life.
First let me point out what is right about this cabin. The first impression is it’s “nice”, and that’s important. The fact that it is a restored old cabin is tremendous. The roof pitches are perfect. It has a standing seam metal roof, a porch on the front and an appropriate sized addition of the back. With that said, let me tell you what I would have done differently…
Let’s start with the porch. I notice that the porch piers which support the porch are made using cinderblocks and that one of them doesn’t line up with the porch post above it. A few easy-to-build stone piers would have been so much better.
I can’t really tell what the porch floor is made of… but it looks like it’s pressure treated. Not a very appropriate material for a cabin… oak from a sawmill would have been cheaper, more attractive, and would hold up longer.
A porch floor should not run the full length of the cabin. I always hold it back a foot or more from each end, that way when it comes time to build the larger porch roof that roof won’t oddly stick out pass the log cabin as seen here.
And what’s up with those massive Parthenon columns on the porch? Are they ten by ten inches? Wow. They are larger than the logs of this cabin. Way overkill and visually very distracting.
And then there is something really odd about the rafter ends on the cabin and porch roofs.
The cabin’s rafters seem to shine as if there is a piece of metal on each one to protect them from rotting, whereas the porch roof rafter tails are nearly invisible giving that roof the appearance of a razor’s edge. I would have put trim boards up on these areas.
It appears that the gable ends, and the addition off the back, are sided using board-and-batten. I have seen hundreds of old cabins over my years of exploring and have never seen a vintage cabin with original board-and-batten siding. B-and-B was used on outbuildings here in Virginia… not on houses. Lap siding would have been a much better choice.
The chimney.
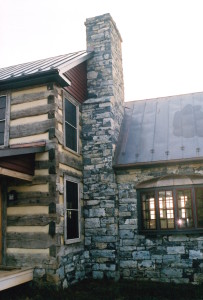
A lot of people look at this structure and they see a stone chimney. I see a cinderblock chimney with stone veneer attached… because… that is what it is.
The masons of old would lay one stone flat one upon the other, they would never lay a stone on edge, and certainly never one on-end as some of these stones clearly are. Our ancestors simply couldn’t build a chimney like this; they didn’t have the glue (cement) that we do today.
The old way takes more time, more skill, and more stone, and the finished look is more subtle and not often appreciated by many, but I find that once a person develops an eye for solid stone masonry, that they will never be satisfied with veneer work again. One quick way to discover the quality of stone work on a chimney is to look at its corners… if the stones are much taller than they are wide, it gets a failing grade.
Next up is the shoulder of the chimney. Why so low? A chimney always shoulders where the logs end and the gable begins. Pay attention to old houses, 99% of them will shoulder at this point. This chimney reminds me of those soda bottles that people used to win at the State Fair that were heated and stretched.
And what’s up the chimney cap? Generally a cap means that there is a gas fireplace in the cabin…
Say it ain’t so Joe.
Of course I would have preferred a solid stone foundation under the house, but I’ll give the builder a pass here. There are old cabins out there, built on piers… complete with cold floors, and grumpy wives with cold feet.
The final issue that I see is the chinking… it’s a bit hard to see in this image, but it appears to have been installed improperly which will eventually lead to the loss of the logs due to rain getting in behind the chink joints and creating rot. I get calls on this issue all the time to come replace and repair situations like this… five or ten years after a cabin is built. It’s not a pleasant, nor inexpensive thing to redo. Sometimes, at that point, the best solution is to side-over the logs.
Ok… there you have it… all that I see on the outside at least. Please don’t send me an inside photo of this cabin. 🙂
Originally posted 2015-03-26 16:16:56.
The Madison House… part 11
The Madison House looked huge from this perspective… at least to this old country boy, who had once lived in a tent for eight months, when he first got married… and in a travel trailer for five years, during his youth.
But 2,600 square feet for a family of five was just right… maybe even, a bit small.
There are a few things I’d like to point out here in this photo…
Notice that we have finished up the stone foundation. I added rock piers and old barn timbers to support the porch above the walk-out basement. This area down below became a very pleasant area.
Also, on the side of the house, is a large bow window, salvaged from an old country store, that I found covered in dust and bird poop in the back of a barn. I bought the window for $50 years earlier and now I finally had a place to put it. Measuring five feet tall by twelve feet long it would allow for tremendous views to be seen while “doing the dishes”.
Originally posted 2015-03-26 15:40:11.
The Madison House… part 10
And then… BAM!!!
The peaceful tranquility of building the first floor deck by myself was gone.
The construction process goes fast during this period. New walls go up all the time. Windows are being installed.
I can’t help but notice the mess… the chaos… of all the equipment and materials that are everywhere. Level areas are at a premium when you build on a sloped site and so any unused spot is quickly filled.
Once the rough carpentry was finished and the tradesmen began their work (plumbers, electricians, and such) my focus drifted to the log cabin work.
Originally posted 2015-03-26 15:19:04.
The Madison House… part 9
Here’s a photo of the first floor deck of the Madison House. I had finished installing the floor joists and am now putting down the plywood decking. My young family would often bring dad lunch and to see how their new home was coming along. It just doesn’t get any better than that.
I’ve said it before… I love this stage of construction. What was envisioned in the mind, and then put on paper, is now appearing as masonry and wood. A dream becomes realty.
There on the deck you may notice my Makita saw. When it comes to saws, without a doubt, Makita is my favorite. They are a pure pleasure to hold and to work with.
When it came time for me to buy a saw I made the mistake of looking at the price tags. I bought another brand of saw, because it was a few dollars cheaper. I was so thankful a couple years later when that saw died, so that I could at last buy the saw I originally wanted.
I think of that lesson every time I look at my blue saw… what a pleasure it is to have what you want. It is always worth paying more to get what you want, rather than living in misery with something inferior, longing for the day of acquiring your dream.
Originally posted 2015-03-26 14:55:29.
The Madison House… part 8
Here’s a “before and after” set of photos showing a corner of the basement foundation… one taken while being built, the other a couple of years later.
This Madison House is fully supported by the poured concrete foundation and the extended floor system that we built upon it. But this ten inch stone foundation that we then added on is stronger than most foundations built today, And so the house now has a double foundation.
A house, built upon a rock should stand forever.
Originally posted 2015-03-25 16:46:41.