Saving a silo… part 6

00000742

And then, we found this under the metal roofing.

I had never before considered that sheathing a roof could create a piece of artwork… until I saw this.

What I witnessed at the peak of this silo rivaled many of the creations that I have seen hang on museum walls.

Originally posted 2015-05-04 03:10:11.

Saving a silo… part 62019-06-29T10:15:01+00:00

What is the best chinking material?

Every time that I write a post, or create a video, on “How I Chink a Log Cabin” my inbox will quickly fill-up with emails telling me about how wrong I am in using cement for chinking, and then go on to inform me of the wonders of synthetic chinking (it seems there is only one… it moves).

I thought that I might create a video pointing out how well cement chinking works (and looks)… and, point out some of the downsides in using synthetic chinking products.

I further thought that perhaps if I didn’t use any of the brand names of those “goopy products”… and, if I made my presentation a bit on the fun side… that all those “faux cement enthusiasts” wouldn’t get all uptight about my favorite material for chinking.

Can’t we all just get along? 🙂

Now as you watch this episode you will quickly agree discover that I am no comedian… but I must admit that I did have a good time making this video (as you will plainly see in the last minute of the video 🙂  Hey, it is ok to talk about cabins and have a good time doing it, don’t you agree?

Even though this video is lighthearted there are some really good points made in it… One is that you should seriously consider  what material you will use when it comes time to chink your log cabin… keep in mind that I’m not trying to sell you anything here on HandmadeHouses.com. We don’t sell cement!  I’m just passing on to you my experience with chinking log cabins over the course of decades and in seeing (and often re-chinking) the work of hundreds of others that was installed incorrectly.

With regard to synthetic chinking… many of it’s problems are revealed before it is ever applied to a log cabin…

1. It’s expensive… often ten times as much, or more.

and…

2. It looks fake… just like those plastic rocks that some folks will put in their yards.

Would you buy a plastic rock if it cost ten times as much as a real one?

I didn’t think so.

I just don’t get the desire to purchase something that tries to look like something else… whether it is plastic rocks, vinyl siding, or tofu bacon… if one builds a house of wood and of stone… a home that has been lovingly hand-crafted of such wonderful natural materials as these… why would anyone then coat about a fourth of their home in plastic?

And then, there is the durability issue…

My goal in building a home has always been to build one that will last for centuries…. at minimum… I believe that any house should be in great shape once a mortgage is paid off… and not be a home in need of major repairs.

If a person has to make mortgage payments for a large part of their life, then at that wonderful moment when they are finally free of that burden they should have something to be proud of… and durable.

It seems that so many modern building products are designed to fail… Take for instance the number-one form of roofing here in the US… asphalt shingles. It comes with a 20-year guarantee… whereas a copper roof should last 150 years. One roof will need to be replaced once it’s finally paid for, the other will be problem-free for our grandchildren… and their grandchildren.

So, when it comes time to chink our cabins… consider how long will cement last? what has your experience been with this product?

In many of my videos I show cabins that I chinked 30+ years ago. In every case it’s holding up, and looking good, with no problems. (I’ve never seen synthetic chinking of the same age on any cabin).

If you haven’t noticed there is an imbalance in information with regard to chinking choices…

The synthetic chinking industry is full of advertising brochures and a sales-force to promote their product…

The cement industry on the other has little interest in telling people that they ought to chink log cabins with their product. The use of cement for chinking is minuscule in comparison to the other uses of cement. Those in this industry are likely unaware of this particular use of their product.

It seems that so many basic “down-home” things in life are overlooked… like cement chinking… because so few step forward to share their knowledge and experience.

My grandmother (bless her soul) would dry her beans by hanging them on a string. My wife does hers using a high-dollar dehydrator… one that I see advertised in many magazines. The string industry just doesn’t do as good of job with marketing their string to folks who like to put away a little food for the winter. lol… likely for the same reason the cement industry isn’t pouring thousands into advertising in the small log-chinking market.

Now to be fair there are some advantages I see to synthetic chinking, but I feel overall these products pale in comparison to “plain old cement”…. here are a few that I can think of…

1) A person can open the bucket and go to work applying it… no mixing needed. (and they get a nice bucket when they are done)… so there is less physical work involved.

2) Synthetic chinking can be considered “wide caulking”. In the building trade the work of a sloppy carpenter can be made functional and more attractive with the aid of a good painter and his caulk gun. Cement makes excellent chinking, but it is not a caulking compound to fill vertical gaps in trim-work… so less care and skill are required when building a log home if we know gaps and holes from hastily done work will be covered over with GoopChink.

3) Contractors and log cabin supply companies earn their living by marking up the price of their materials to the homeowner. It’s a common business practice… 15% of $300 worth of cement is $45…. 15% of $3000 of GoopChink is $450 … so, a much bigger paycheck can be had at the end of the week.

4) In the first few years after synthetic chinking has been applied, while it is fresh, new, and sticky… while the home is under warranty… Goop Chink can be applied improperly and still do it’s job of keeping water out (but only for a while… eventually there will be problems). Whereas improperly installed cement chinking will let you know it was done wrong within days…. so there is less of a chance of receiving a call to come fix something during that mandatory one-year warranty that most home-builders must provide if synthetic chinking is used. Score one for the contractor!

Now am I saying those who use synthetic chinking are bad people and…

1) are trying to do less work?

2) or, are less skilled?

3) or, want to make more money?

4) or, don’t want to do free warranty work for clients a few months after the project ends?

Well, of course not… not at all… but… we do have to acknowledge that the motives to do so are there.

Again, let me repeat… there are a few log builders out there that I highly respect… one’s that use synthetic chinking… exactly why they use it… I don’t know.

For me though, in choosing between the two options, it all comes down to the fact that on each home that I build I try to do my best to build that home as well as I can…

I keep in mind two things…

I ask myself first… what is the most attractive option that I can use?

I like things to be attractive… it’s a weakness of mine…  no matter what… for instance, I married the prettiest girl that I had ever seen. 🙂

Cement chinking looks great, plastic chinking (that is supposed to look like cement) does not.

And secondly…. what is proven to be the most durable and long lasting? … (that pretty girl I married has only gotten better… and durable? well… 34 years later she still puts up with me. 🙂

Synthetic chinking has been around for well over 30 years now… has anyone ever seen an image of a log cabin with 30 year old synthetic chinking on it? I haven’t. If you have one please send it to me.

To wrap all this up… if I get the same answer to both of these questions… attractive? and, proven durable?… then I’ve likely found what I will go with… other considerations often seem minor in comparison.

Originally posted 2017-07-16 13:31:05.

What is the best chinking material?2019-06-29T10:15:00+00:00

Saving a silo… part 5

00000740

The amount of work and the skill level needed to create a complex metal roof like this kept us humble. A piece of artwork.. all the way up here on the top of silo… where no one would ever see or appreciate it.

Originally posted 2015-05-04 02:55:48.

Saving a silo… part 52019-06-29T10:14:59+00:00

Saving a silo… part 4

00000739

Our first goal in taking the silo down, is to remove the roof.

In order for it to come down, we must go up.

00000738

It’s a long way up there.

The view is spectacular.

00000746

The only tools needed was a crowbar, and a camera.

Originally posted 2015-05-04 02:47:15.

Saving a silo… part 42019-06-29T10:14:58+00:00

Saving a silo… part 3

00000744

The first thing we did was to look the silo over thoroughly.

When we restore on an old building, or as in this case, when we take one down, we want to get to know the building first… to see how she how she was built, and to find out what condition she is in.

Here on this silo we spent a good bit of time inspecting the base of the silo. If we were to find a couple of bad courses on one side of this structure, it would be no different than taking a notch out of the base of tree… the whole thing could come crashing down at any moment.

And, riding one of these silos down to the ground, while working up on top, could ruin a person’s day.

00000747

We also spent some time pulling down all the vines that had grown up the structure… and there was plenty of them, as you can see in the photos. Vine growth can quickly lead to rot on wood structures.

00000754

We were pleased to find that these vines hadn’t created any damage. And, our base inspection concluded that everything was still solid and sound.

It was time to climb to the top and begin our work…

Originally posted 2015-05-03 18:38:41.

Saving a silo… part 32019-06-29T10:14:57+00:00

Saving a silo… part 2

00000762

The silo was originally connected to a large dairy barn… both built about the same time, likely late 1920’s or somewhere in the 30’s.

The farmer would raise corn and then use a conveyor to fill the silo through the window opening in the roof. The corn would then be shoveled through one of five openings located on the barn side, to feed the milk cows throughout the year.

00000764

Corn went in one end of this structure… milk came out the other. Pretty cool huh? And there I thought milk came from the grocery store. 😉

This barn was ready to collapse at an moment. We did not salvage any material from it, and frankly, we were relieved that it did not fall while we were there salvaging this silo.

00000763

Originally posted 2015-05-03 15:35:29.

Saving a silo… part 22019-06-29T10:14:56+00:00

Saving a silo… part 1

00000748

Here are a few photos taken the day we started our process of dismantling this silo.

She, and the barn she was connected to, were destined to be burned down. If we had not taken her down then, all that would be left of this structure today would be these photos.

The first thing I notice in looking at these photos is that she looks a bit shorter than the finished restored silo that we rebuilt… and that is because we added a stone base and a row of windows at the top.

00000737

I also see the remaining plaster that still adheres to the outside. The plaster remained intact on the inside but the outside has lost most of it’s finished surface. We contemplated building the silo back with this aged look, but in the end declined.

00000750

Even though the silo here looks shorter than the finished restored structure, she was still very intimidating to climb.

Originally posted 2015-05-03 15:15:35.

Saving a silo… part 12019-06-29T10:14:55+00:00

Saving a silo

00000736

A while back I shared with everyone the re-construction of an eleven-sided silo, and the process of building an “undecagon” stone base for it to rest on.

00000650

Well, I just found a packet of old photos that I took of the silo as she originally stood, and of our salvage operation of it. I think you will find it of interest (if not, just sort of tune me out for a couple of days ;).

I apologize that this is out of order… I feel a bit like George Lucas in that now I am releasing the prequel… lol. I promise there is no Jarr Jarr Binks characters.

So, to start, here are three of photos of the reconstruction to remind you of the finished product.

00000722

Originally posted 2015-05-03 14:15:07.

Saving a silo2019-06-29T10:14:54+00:00

An new/old cabin improves with age

00000214

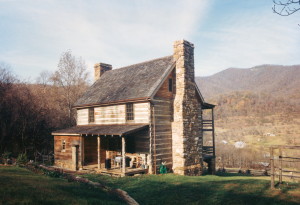
One last look at this little cabin.

This photo was taken years after it’s construction. I think she has held up very well.

That’s one great thing about building structures with antique materials, and with a traditional design… they actually improve with age.

Originally posted 2015-05-02 16:09:58.

An new/old cabin improves with age2019-06-29T10:14:53+00:00

Dating a barn door

00000213

I found an old barn door that fit just perfectly on this cabin.

It was a very old door, with a wooden lock, hand forged hinges, and two horizontal battens on the inside holding it together.

The quickest way to date a barn is to look at it’s doors.

If you see a “Z” pattern on the batten side of a door, she is a twentieth century barn. “Z” bracing did not exist in Virgina prior to the Civil War… at least not that I have ever seen.

Originally posted 2015-05-02 14:37:35.

Dating a barn door2019-06-29T10:14:52+00:00
Go to Top