29 06, 2019

What size log is best for a log cabin?

2019-06-29T10:58:40+00:00

IMG_2944

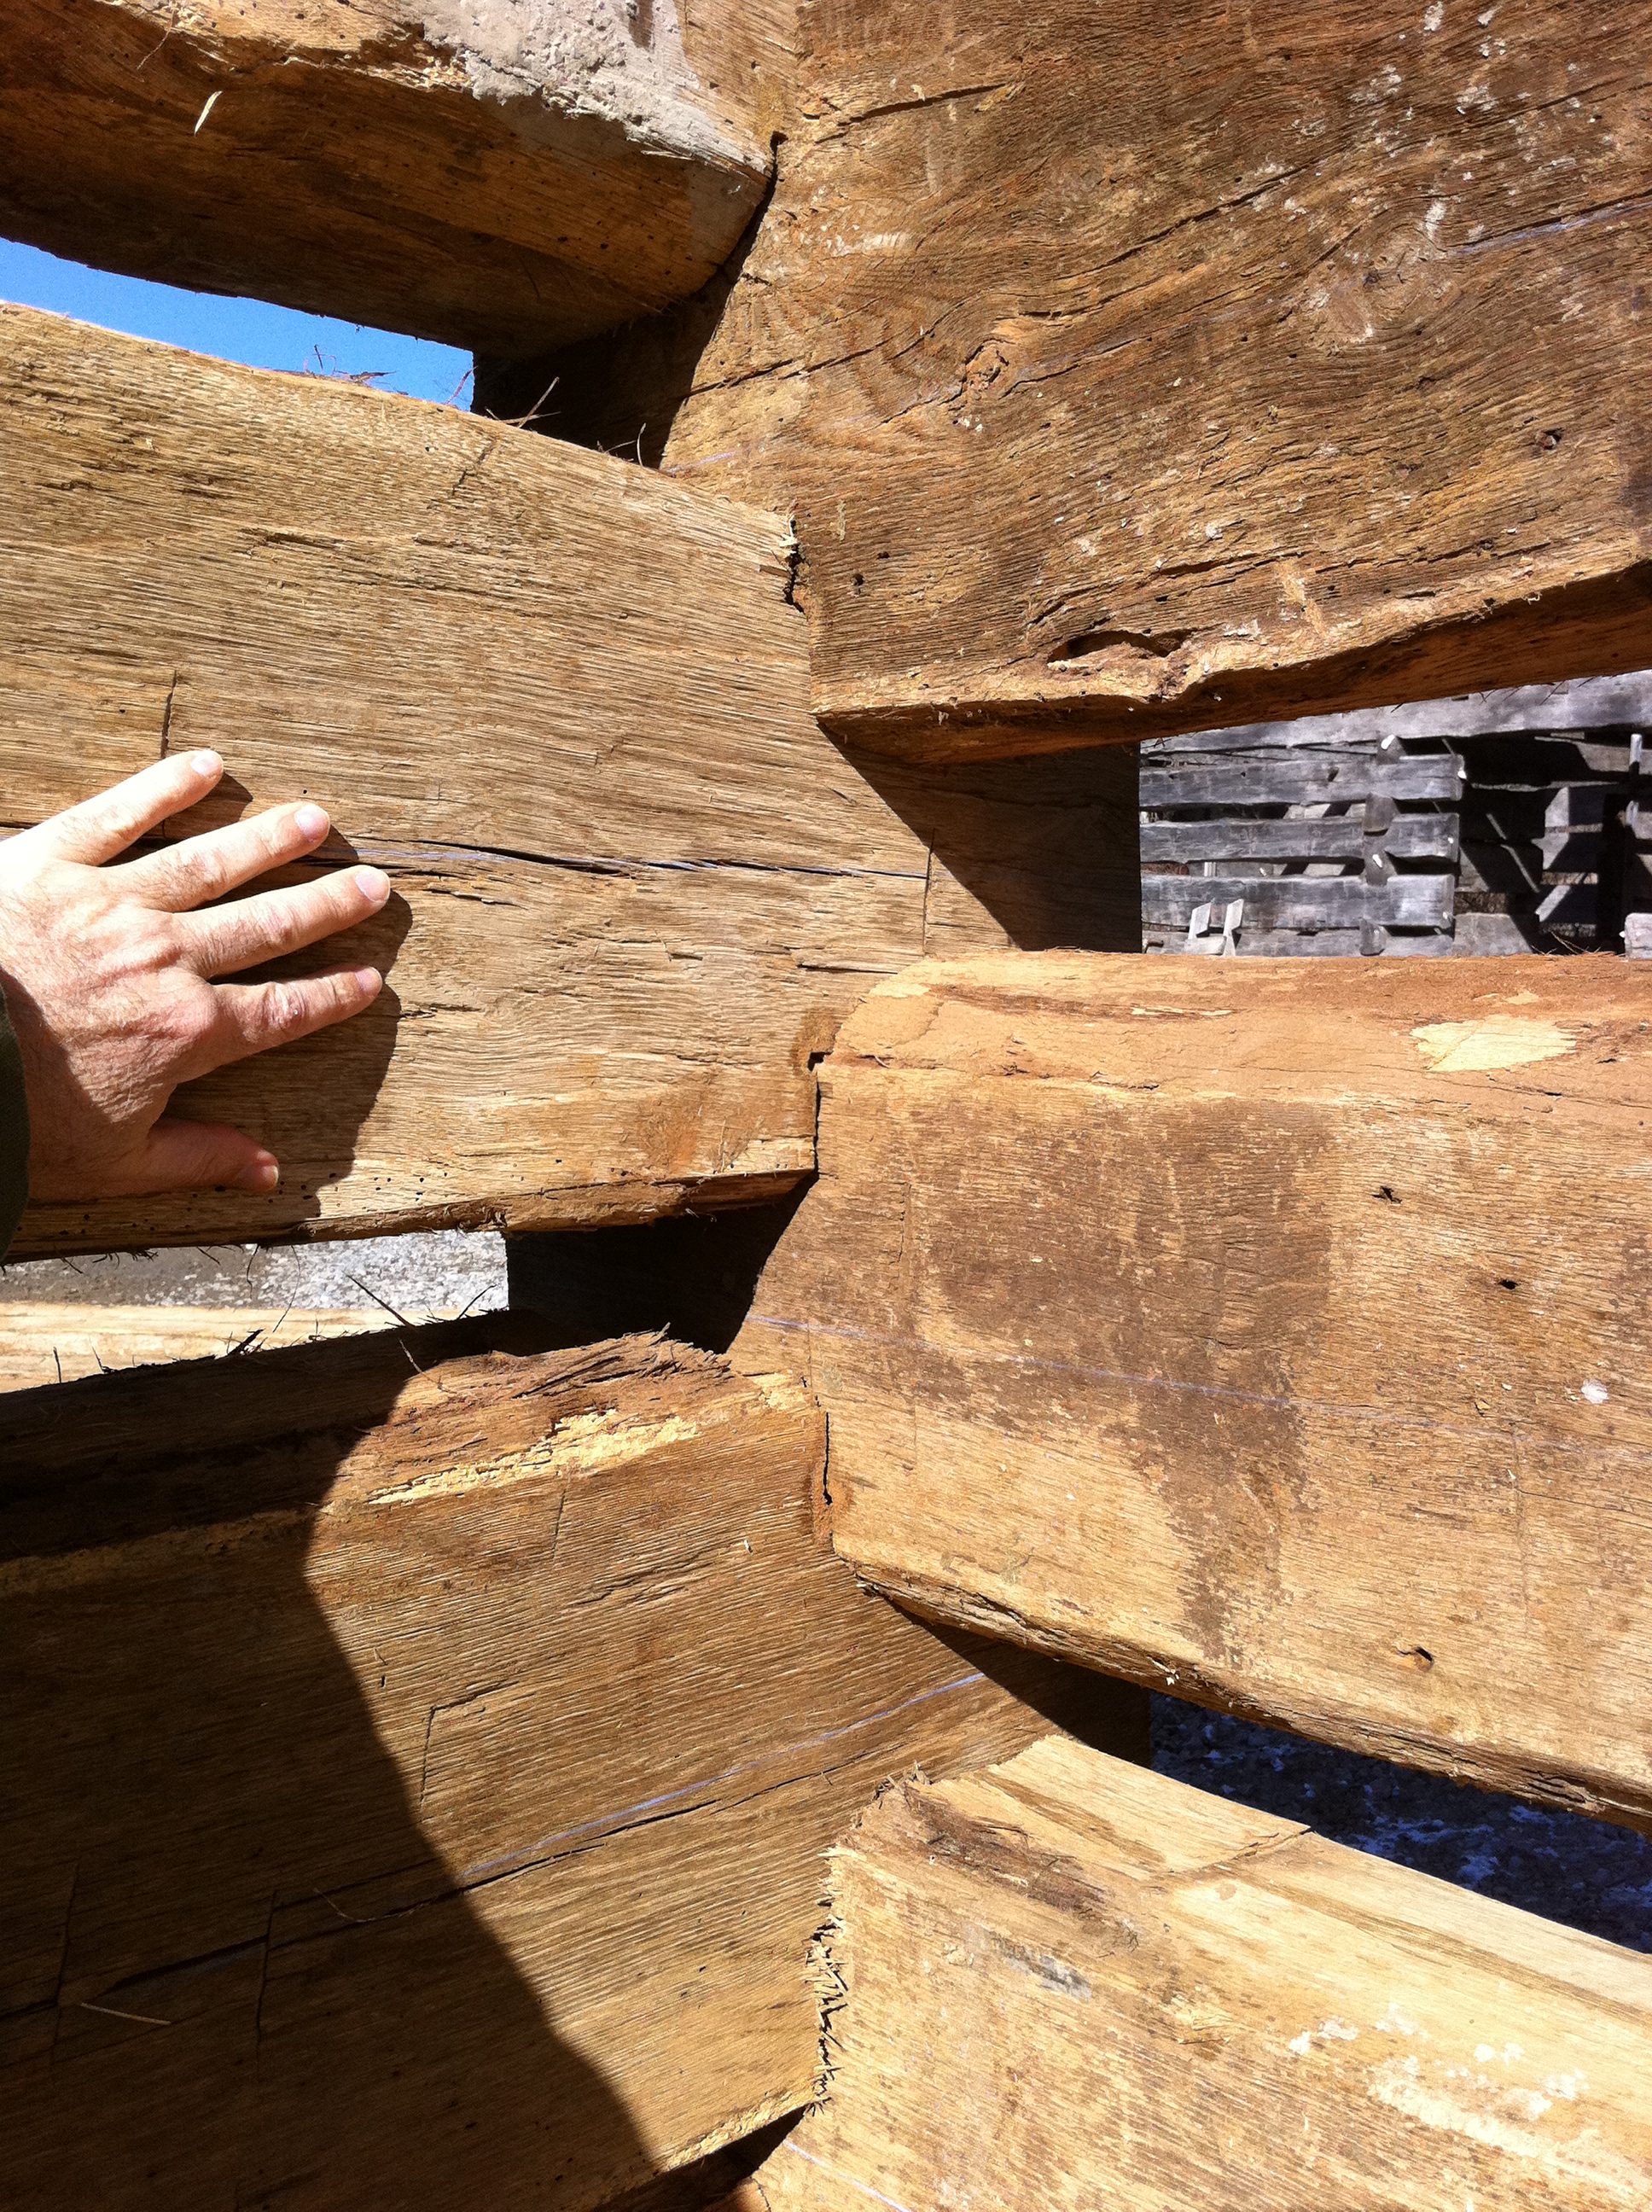
A quote from Wikipedia this morning…

“The Goldilocks principle is derived from a children’s story “The Three Bears” in which a little girl named Goldilocks finds a house owned by three bears. Each bear has their own preference of food and beds. After testing all three examples of both items, Goldilocks determines that one of them is always too much in one extreme (too hot or too large), one is too much in the opposite extreme (too cold or too small), and one is “just right”.

The same holds true of log cabins.

Here are three different log structures, each offers an example of too small, too large, or “just right”.

When I first started my love affair with log buildings, I loved them all.

I must admit, I still do.

But, my tastes have refined over time. When someone comes to me and requests that I build them a cabin as nice as I can what do I look for in seeking out an old cabin? Well, one the key features on my list is log size.

00002636

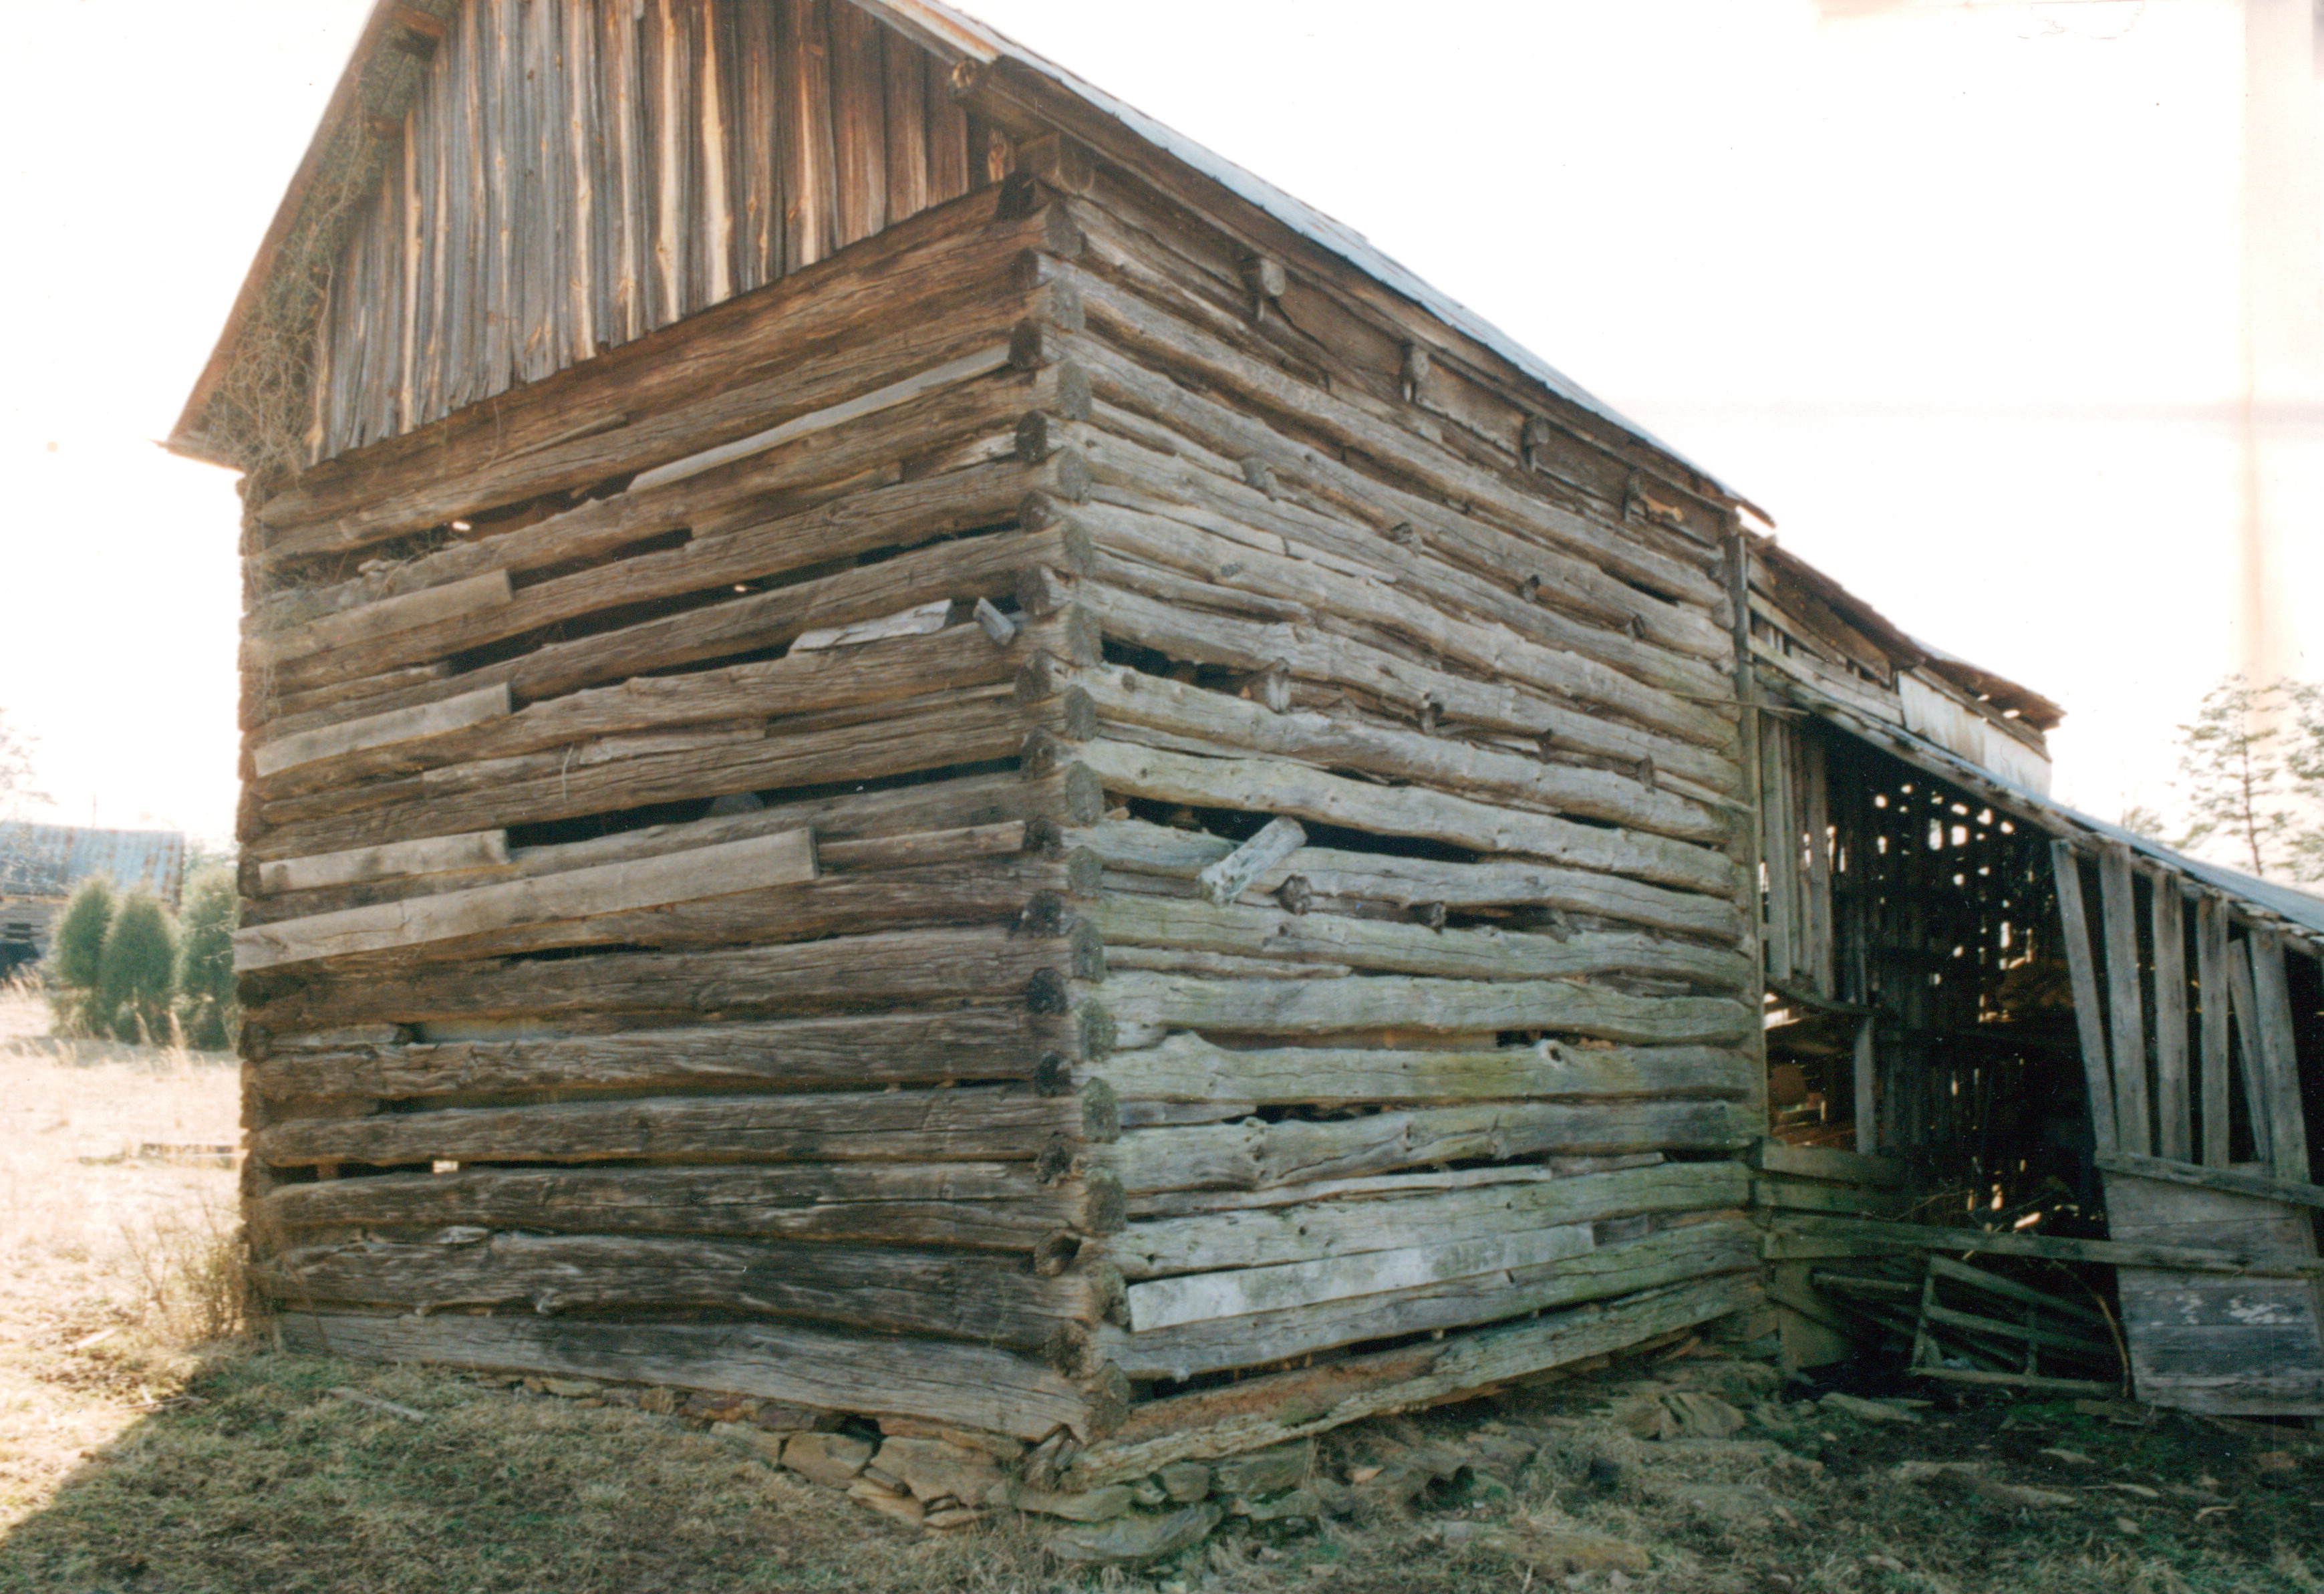
Take a look at the photo of the wonderful old tobacco barn. She is still in remarkable condition thanks to that nice roof still providing protection from the rain. This cabin is perfect for what she is (an outbuilding). She could also be made into a fine home, but we would find that once she was chinked the finished cabin would look a bit “busy”… sort of like a pin-stripe shirt.

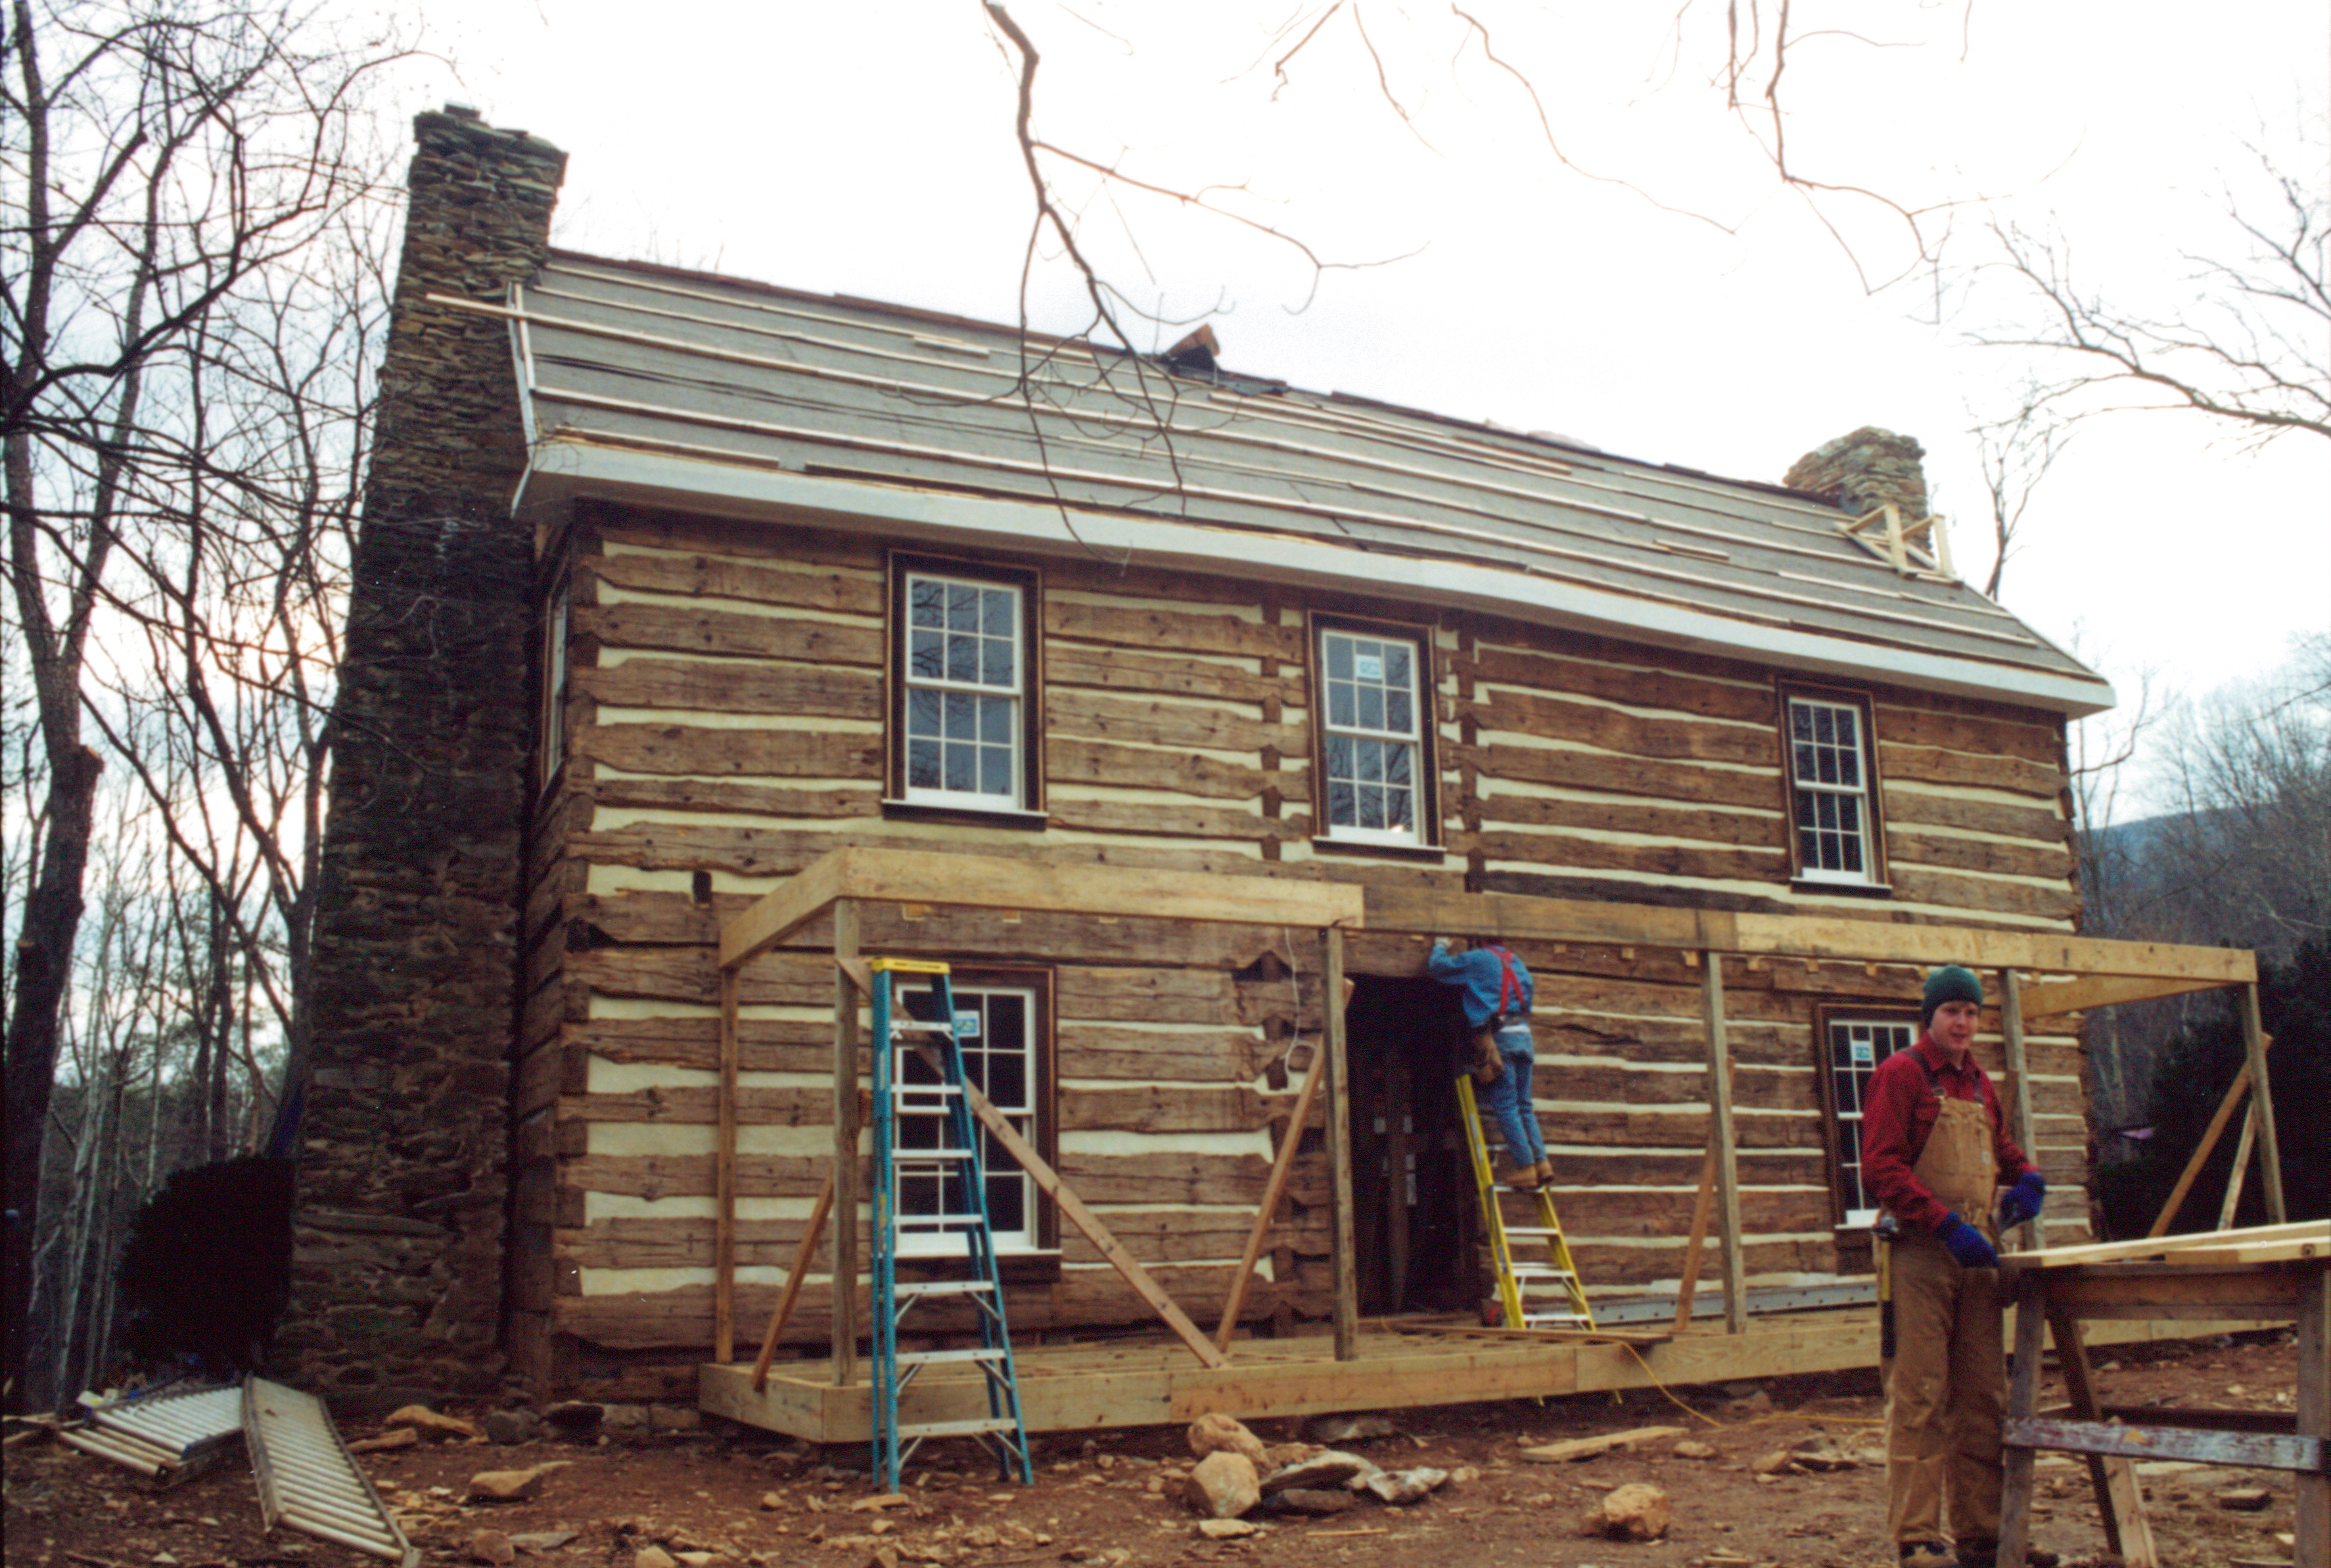
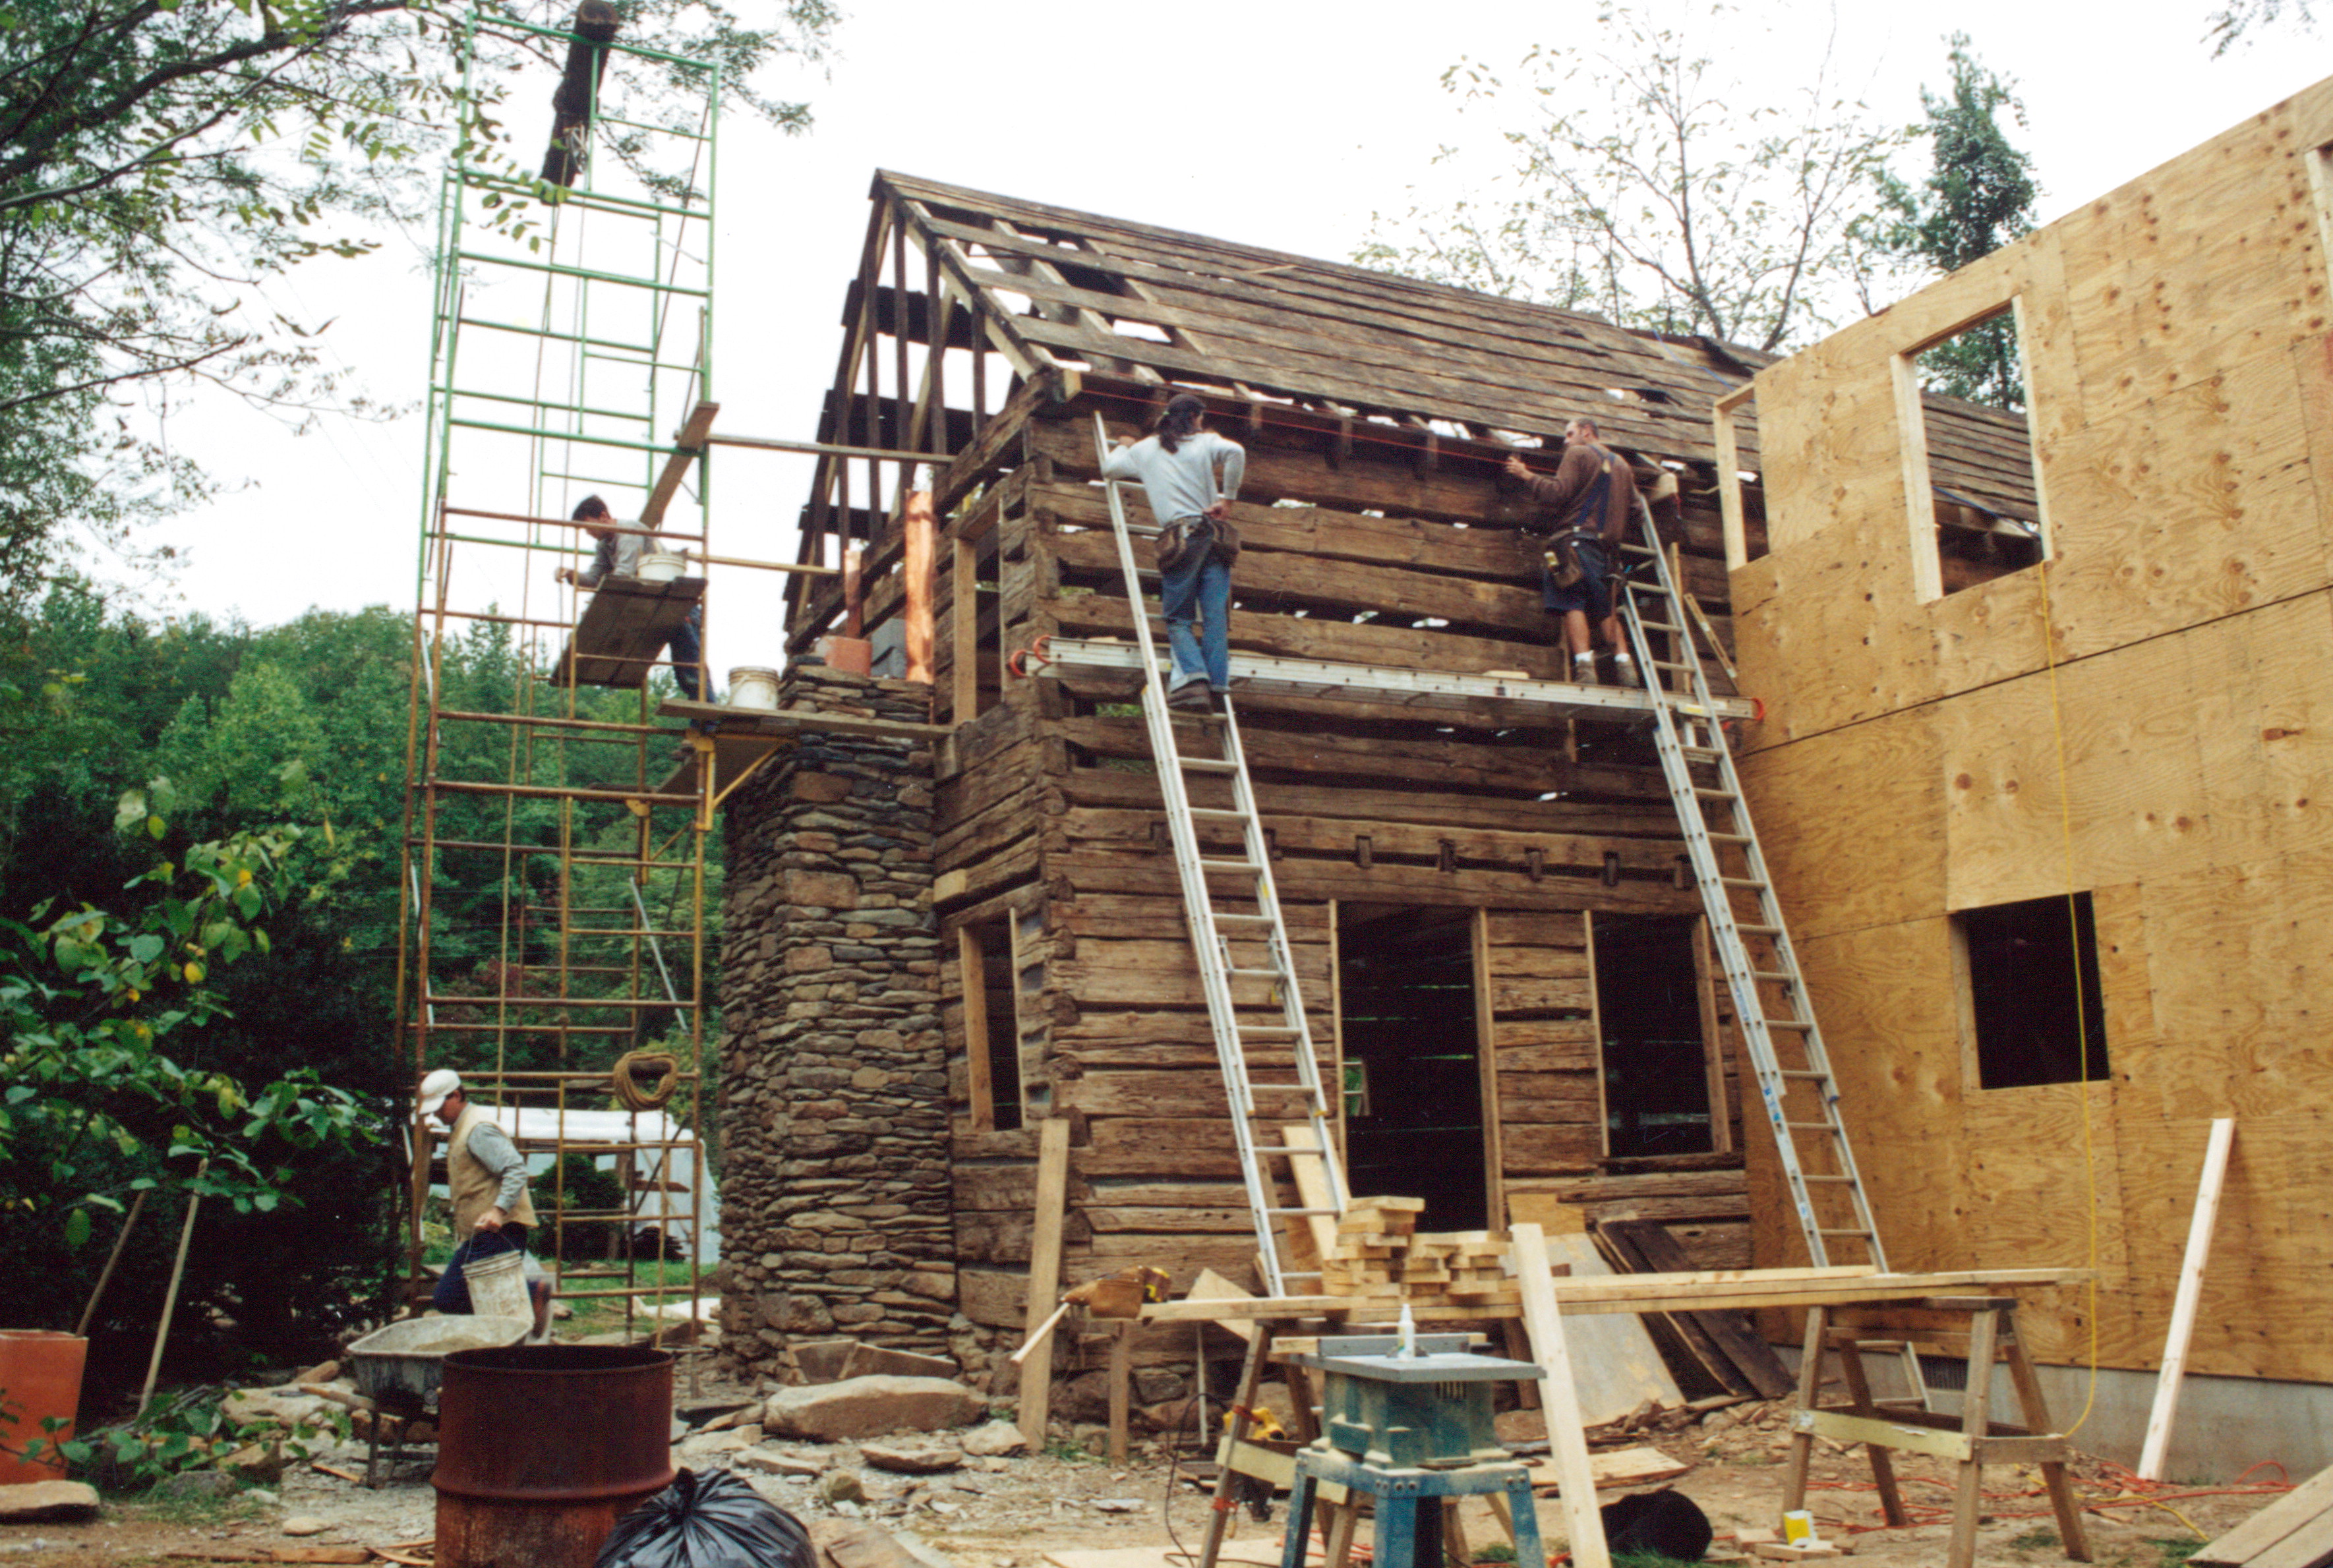
From “too small” it’s easy to move onto the concept of “bigger is better”. Certainly massive logs are impressive, and I went down that path early in my career (as you can see in the photo posted below of the log structure without a roof). I bought the new pine logs that make up this cabin off of a Mennonite sawyer and notched out this cabin myself. Each log was more than two feet wide. I was going to make something spectacular out of these logs, but I found when I finished assembling this cabin that the logs themselves were distracting from the overall cabin. Everyone would comment on the logs, not on the cabin. (I ended up selling this cabin to man who wanted to finish building it himself, I learned later that the cabin had burned to the ground before he finished… so sad)

00000242

So, what size logs do I look for?

Well, the perfect size log depends upon how large of a cabin I am building. For instance years ago when I built a play log cabin for my kids five inch logs worked perfectly there. For a large log home I like logs that are ten to sixteen inches wide (a bit of variety is good) with four to six inch wide chink joints in-between.

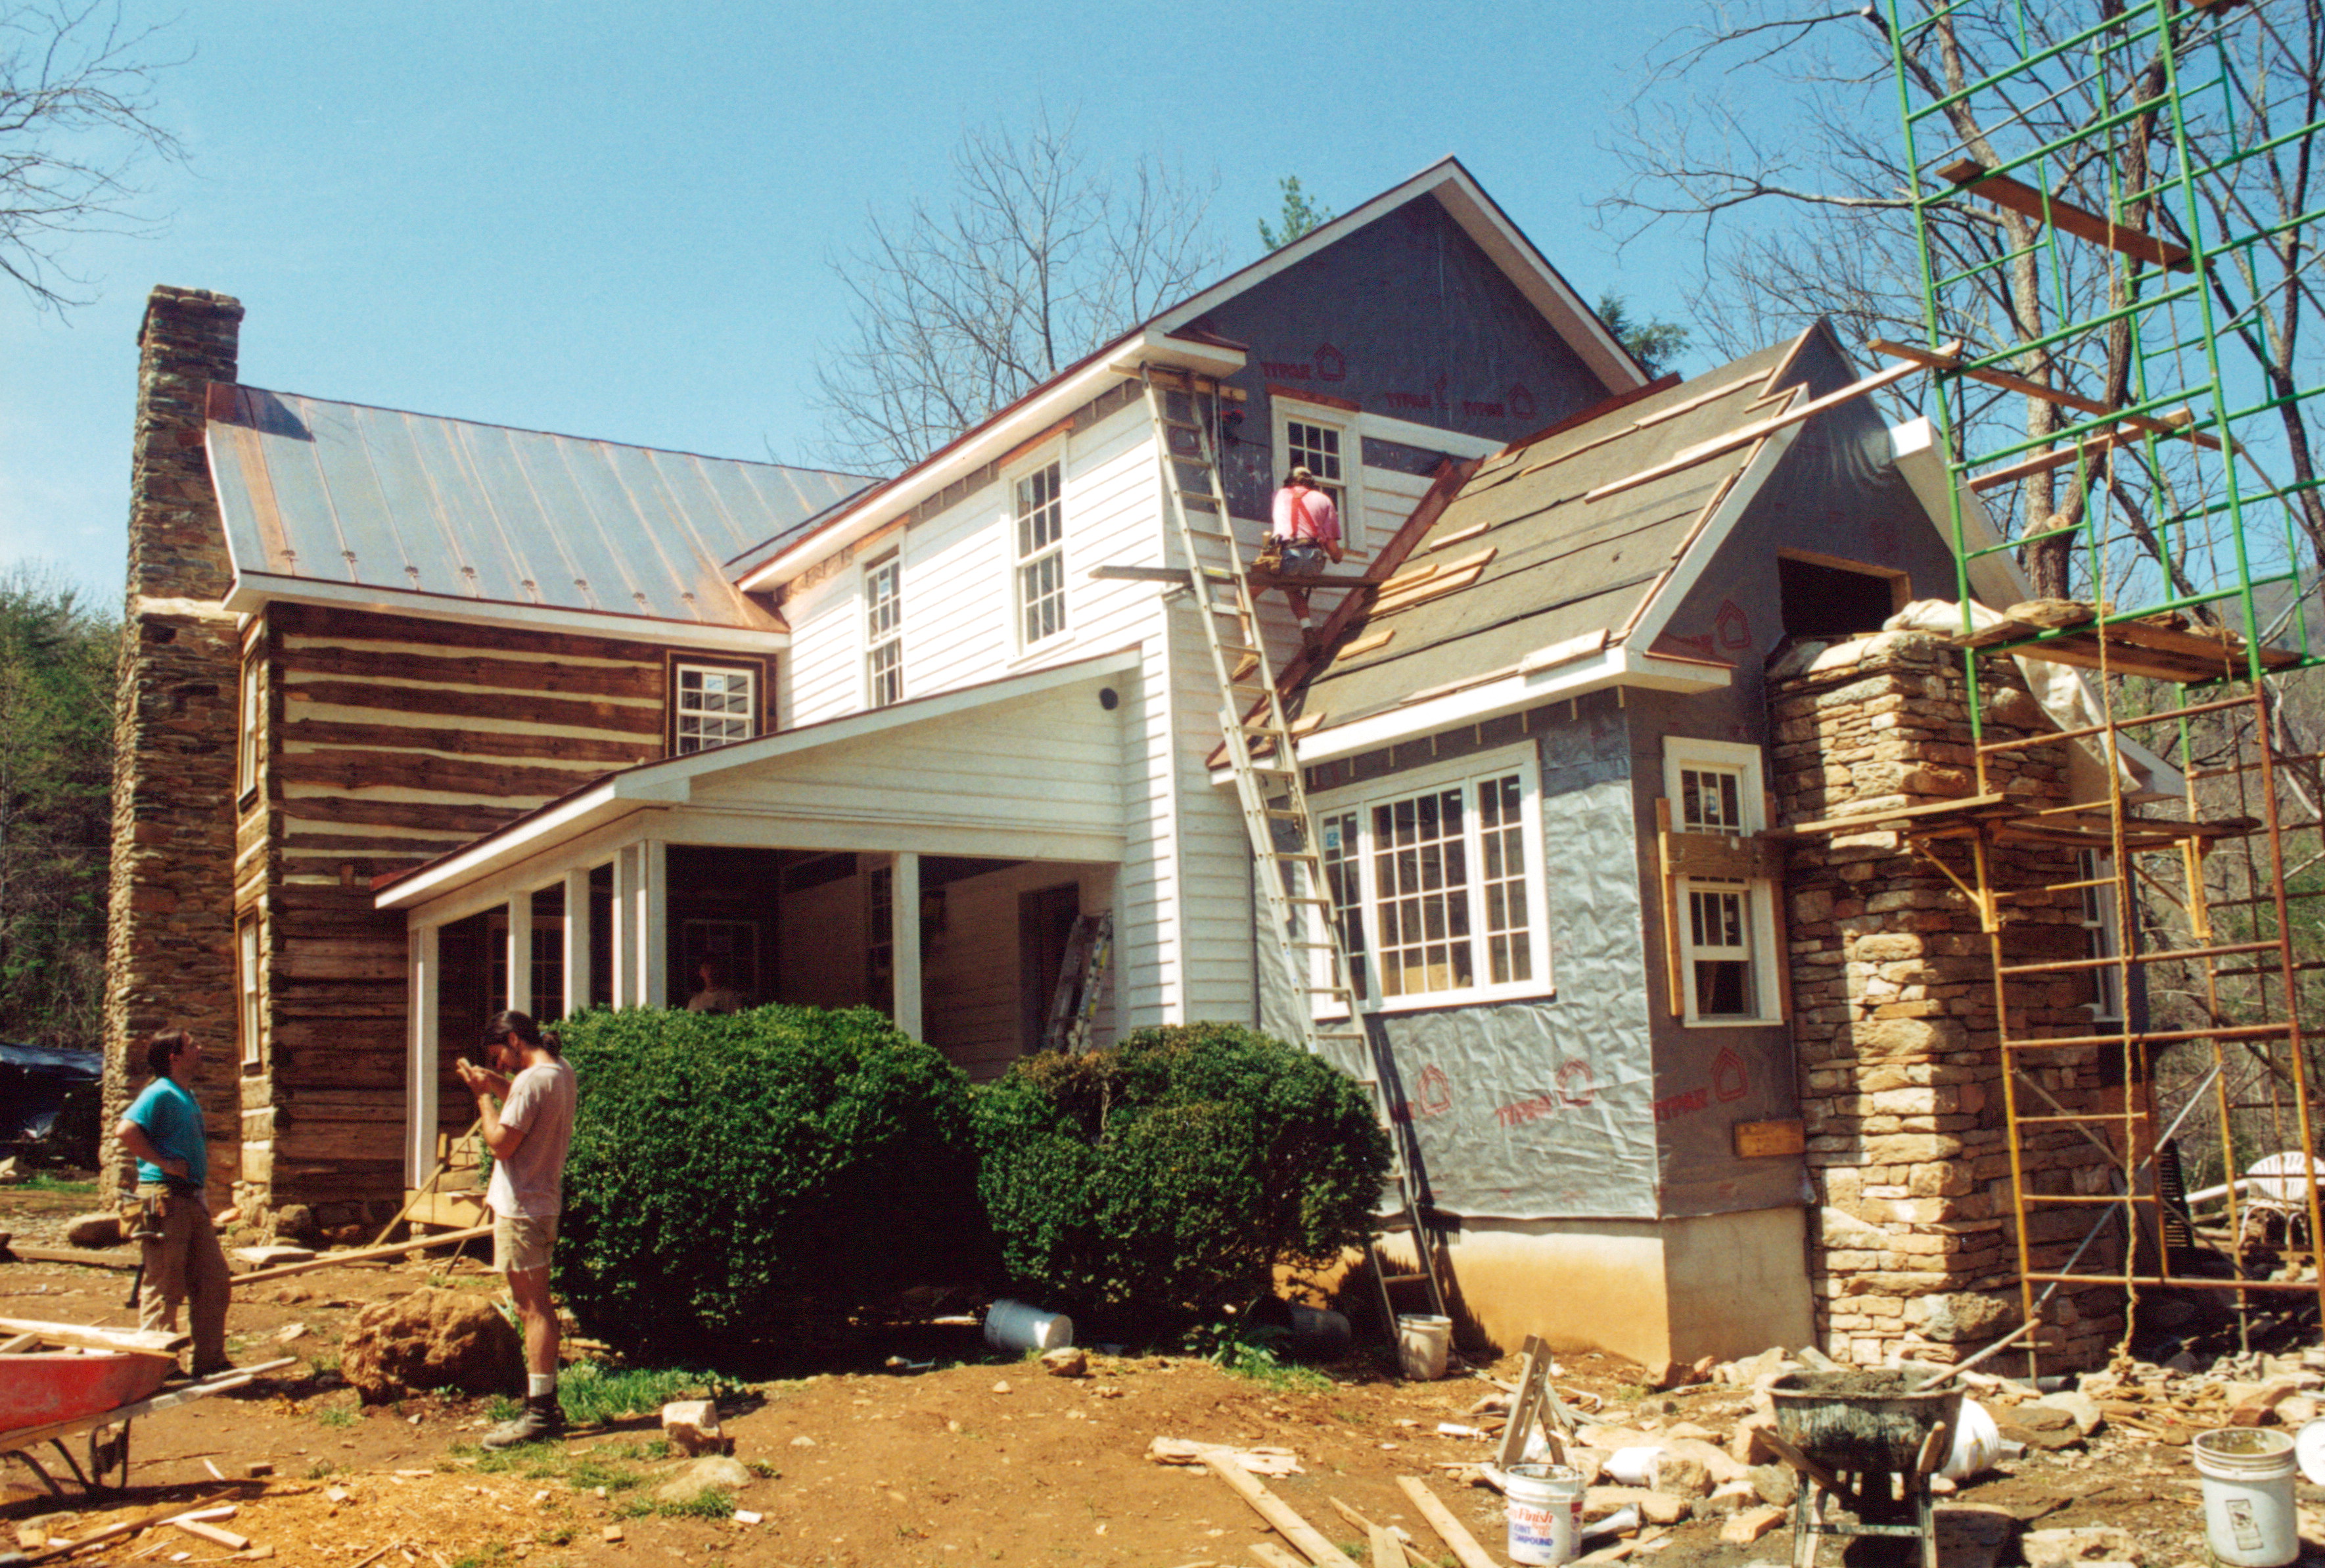
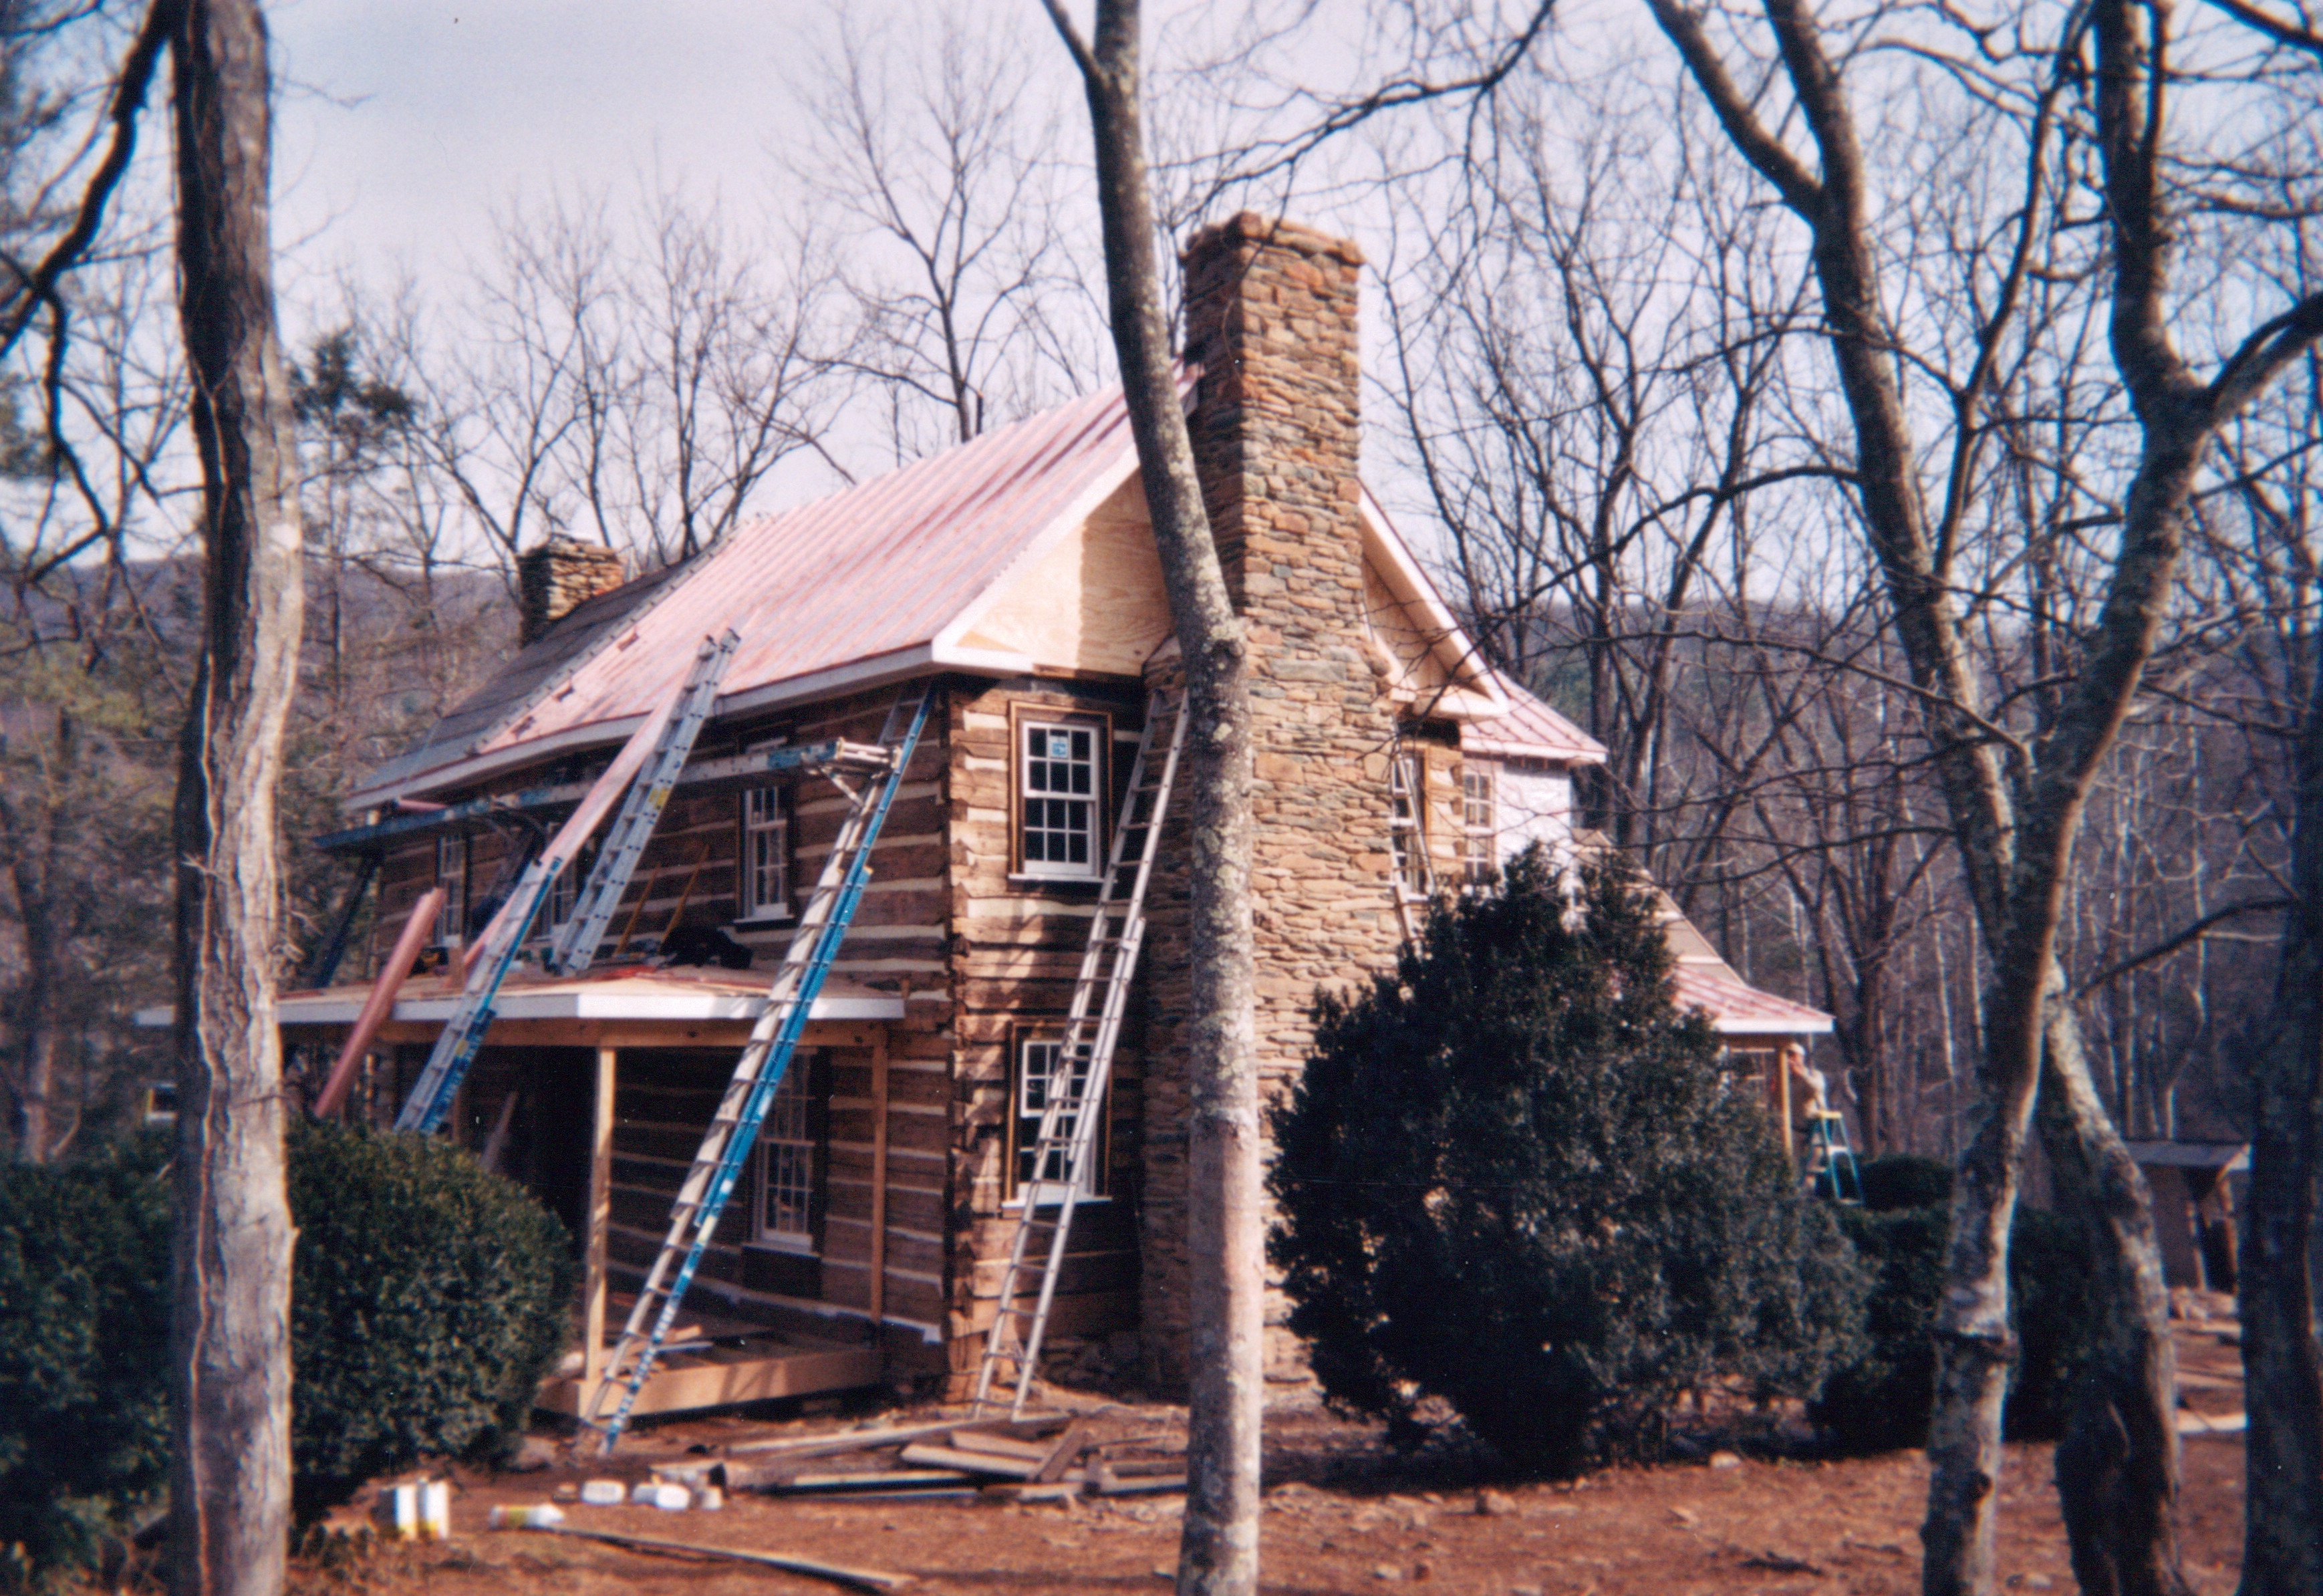
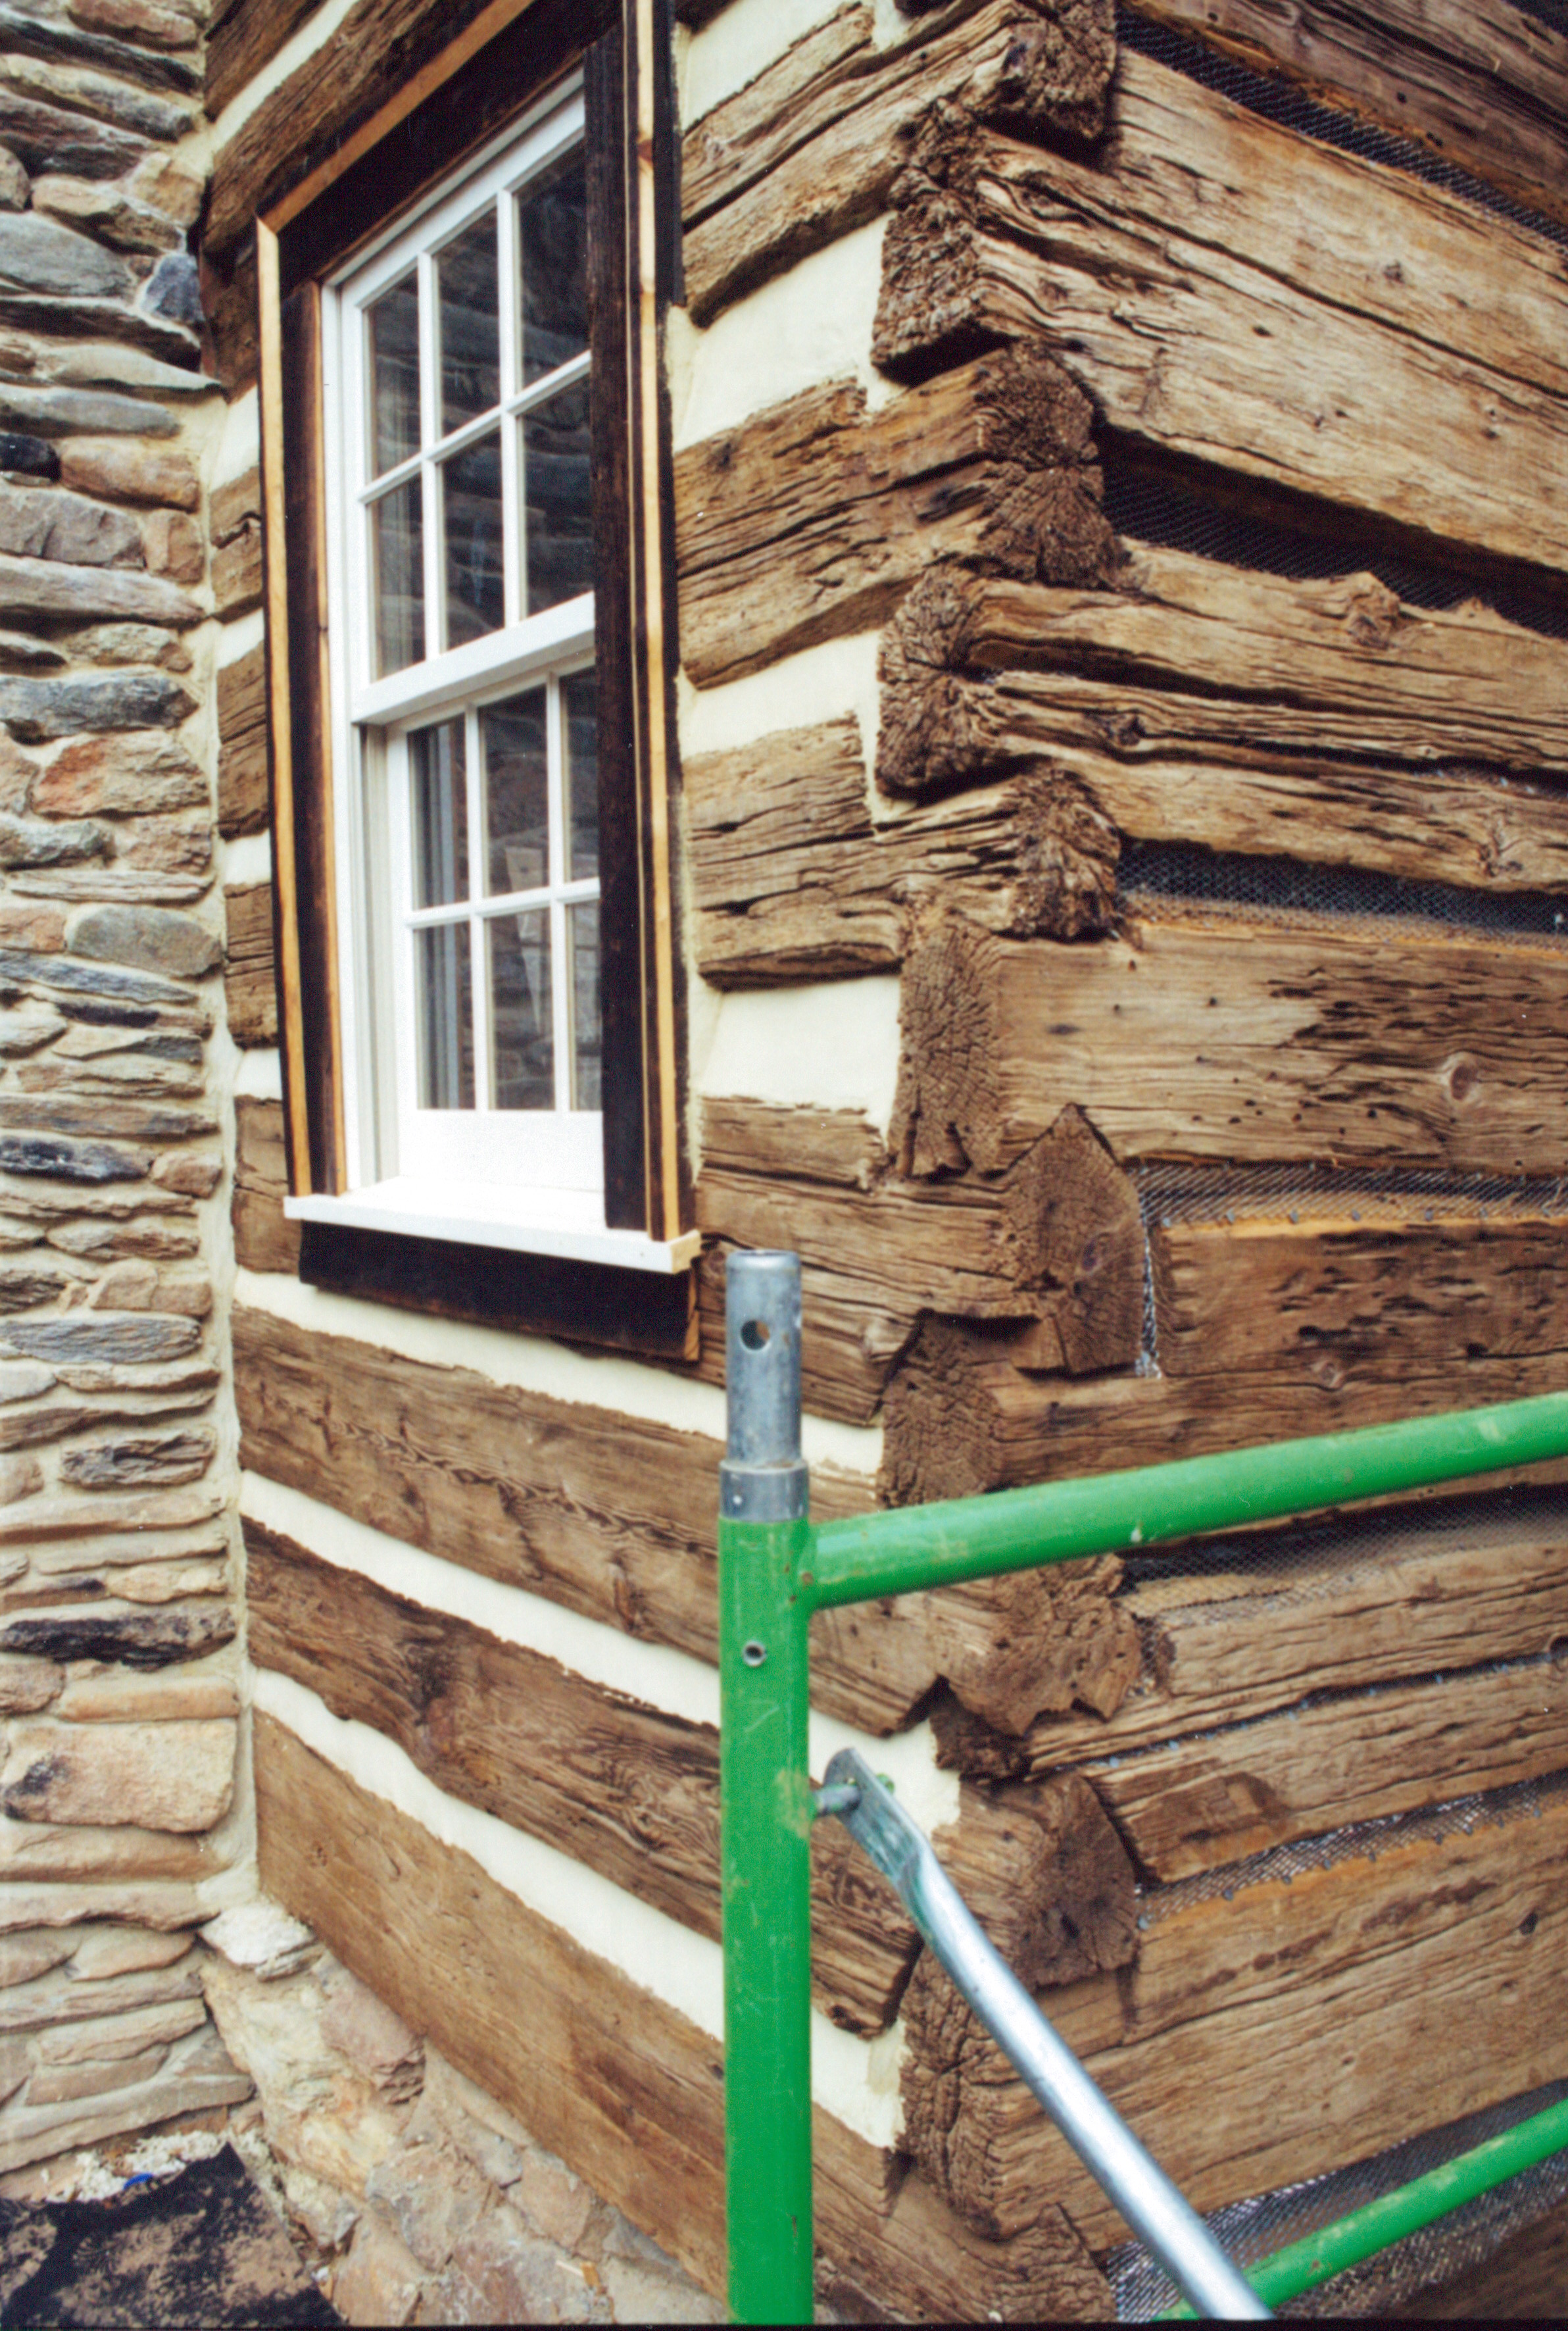
Lastly, I have posted here a photo of a corner of a cabin that was “just right”… in fact, it was so perfect that I had to reach out and touch the logs.

That is the great indicator of having found perfection. When your eyes tell your brain that more input is needed and you find your hands reaching out without giving a thought to doing so… you’ve likely found something special.

What size log is best for a log cabin?2019-06-29T10:58:40+00:00
29 06, 2019

Log cabin restoration… part 19

2019-06-29T10:58:24+00:00

00001245

I admit it, I did “refine” this old cabin a bit.

I felt she deserved it… like jewelry on a woman… the returns on just a small touch or two are exponential.

She now has a copper roof with ornate returns at each corner. We put a hip roof on her porch which really makes her front profile snap. And we applied painted siding to the cabin’s gable ends to help her blend with her addition and give a cleaner look to the logs.

I think the original builders of the cabin would be proud to see their work looking this good 175 years later. I wonder how many builders today will be able to say the same about their creations that far into the future?

Log cabin restoration… part 192019-06-29T10:58:24+00:00
29 06, 2019

Log cabin restoration… part 18

2019-06-29T10:58:23+00:00

00001240

Here’s the back corner of this home.

I often judge a home’s design by how the most neglected viewing of the home appears to me.

Notice some of the details found back here… under the ladders you will see that the electric meter and gas supply have been enclosed in a nicely boxed attachment to the house… for a hundred dollars worth of labor and some scrap material left over from the job and these owners will never have to see those ugly utility features stuck on the side of their home.

Then there is the attic vent, created from an old window shutter found on site. Here we likely just saved that hundred dollars that it cost to build that meter base box and as a result we’ve got something more solid, more attractive, and we did the environment a favor by recycling.

Then there are the little returns on the corners of the roof. Just a small touch, but they really snazz a house up.

I had hoped to make this little addition out of stone… it would have been nice… and it wouldn’t have taken a lot of material… but the budget wasn’t there for it… there is always a budget that I struggle with it seems.

Log cabin restoration… part 182019-06-29T10:58:23+00:00
29 06, 2019

Log cabin restoration… part 17

2019-06-29T10:58:20+00:00

00001231

The addition came together well off of the back of the cabin.

There was, of course, a large screened in porch. And, behind it a new large kitchen with tall ceilings. Above it, was the master bedroom suite.

And nearest the camera… the section with a chimney under construction… is the future home office/den.

The old log home provided three bedrooms and a living room to the home.

Log cabin restoration… part 172019-06-29T10:58:20+00:00
29 06, 2019

Log cabin restoration… part 15

2019-06-29T10:58:18+00:00

00001225

As you can see we were moving along on restoring this cabin. The roof is now ready for the standing seem copper to be installed. All that we needed to do was build the front porch roof before we could call in the roofers.

Notice that we have finished the chinking on this side of the cabin… and if you look closer you can see something that I’ve never seen on another cabin…

On both sides of the entry door you will see log ends from interior log walls. I have found that a single interior log wall on an old cabin is very rare… two, is practically unheard of. To me, it spoke of the probability that the original owner of this cabin was a man who had time, and likely the funds to pay others to build him a large home… in other words, this home was for a man of financial means.

Log cabin restoration… part 152019-06-29T10:58:18+00:00
29 06, 2019

Log cabin restoration… part 14

2019-06-29T10:58:17+00:00

00001219

Here’s a great photo that shows the steps in properly chinking a log cabin, and what the finish result should look like.

On the right side, if you look close enough, you will see that we have installed the diamond mesh metal lathing. It is now ready for a layer of cement to be troweled on.

On the left side you can see that we have smoothly troweled on the mud leaving no mess on the log, nor have we chinking the corners… which so many do… which just looks terrible.

We use a special type of cement known as Flamingo C-74…. We DO NOT use permachink. I do not like to use plastic products, nor do I trust that they will hold up over time as well as much cheaper and more attractive natural products.

The most critical part of the chinking is how the chinking runs out flush to the log on the bottom, but is recessed at the top of each course of chinking. If the chinking is not applied like this water will get in behind the logs and rot out them out.

Improper chinking by others is the number one call I get from log cabin owners. The process of extracting poorly installed chinking and applying it correctly is not enjoyable, nor is it inexpensive.

It pays to do the job right the first time.

Log cabin restoration… part 142019-06-29T10:58:17+00:00
29 06, 2019

Log cabin restoration… part 13

2019-06-29T10:58:16+00:00

00001221

Here’s an interesting detail photo.

And no, it’s not because Marcello is standing in the corner talking on a phone in an early 1800’s house. lol

Here you can see we have extracted the first floor floor joists. They were sagging and bouncy and had seen their best years. We had carefully removed the flooring and would reinstall it just as it originally was was over top of a new insulated floor system.

Notice that the fireplace had long ago been bricked off and a hole had been created so that a wood stove could be vented. The one feature that draws my eye is the hearth and the support stonework that had held it up all these years… just a primitive stack of rock with smooth layer of cement at the top for all to see.

Log cabin restoration… part 132019-06-29T10:58:16+00:00
29 06, 2019

Log cabin restoration… part 12

2019-06-29T10:58:15+00:00

00001207

Here we have the best of both worlds, the old and the new.

Plywood is an amazing material, perhaps the only modern material that carpenters of old would have been impressed with and likely have used themselves if it had been available.

It’s such a great material that most builders today don’t use it… go figure.

Chip board is much cheaper… which are sheets of material the same size as plywood and are made from glue and wood pulp. If, or should I say when, this glue ever starts to fail, most houses built today will quickly turn into piles of bio-hazard mulch.

Log cabin restoration… part 122019-06-29T10:58:15+00:00
29 06, 2019

Log cabin restoration… part 11

2019-06-29T10:58:14+00:00

00001208

Around back our focus was building a stone foundation under the old log home where none ever existed… and in building a foundation for the future addition.

It’s a strange thing about masons and carpenters… Masons spend most of their life in contact with the Earth. And carpenters… well, they spend a great deal of their time on ladders, reaching for the heavens.

Having both trades work together on a house has always been a treat for me.

Log cabin restoration… part 112019-06-29T10:58:14+00:00
Go to Top