A double pen log barn… part 7
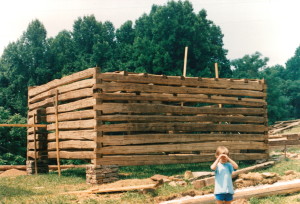
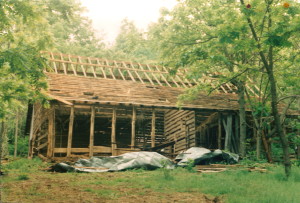
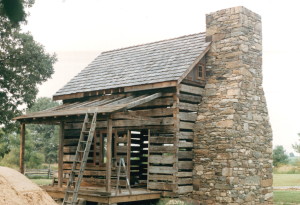
And now one of the “pens” of this double pen log barn has reached one story tall in height.
There are a few things here that I’d like to point out…
First, that’s my oldest son in the foreground taking a photo of dad with his imaginary camera. (he, with the aid of his lovely wife, recently gave me my latest grandson). The days are long, the years are short.
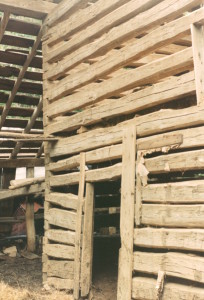
Second, notice the square notching in the corners. It’s an easy notching technique to use and so it is most commonly found in barns built by farmers. Each course was pegged through these notches to secure the logs. (if you look close at the photo you can see pegs sticking up in each corner.
Finally, notice how disappointing a one story log structure it to the eye. All the horizontal lines found in a cabin only accentuate this problem. To me it looks like a cigar box.
A log cabin needs to be at least a story-and-a-half tall to be attractive.
Originally posted 2015-03-16 15:57:30.
A double pen log barn… part 6
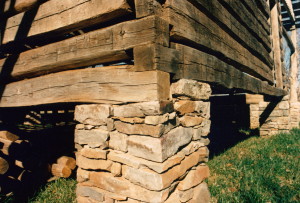
The masons did a great job at building eight stone piers on which the two log pens would rest upon.
I would have preferred to have had a solid stone foundation, for the added strength, stability, and appearance, but that’s not what the barn originally had for a foundation… so, we stuck with the plan of “putting her back up as she had been”.
Originally posted 2015-03-16 15:23:00.
A double pen log barn… part 4
The double-pen barn had reached her new site and it was time to rebuild.
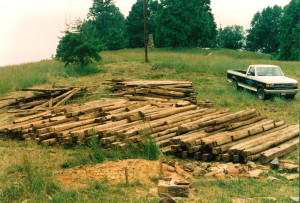
Has anyone else ever played a game called “pick up sticks’?
How about tinker toys?… or Lincoln logs? … you know… the toys where you dumped out all those pieces and then it was time to put something together?
Well, that’s how I felt when I gazed at this pile.
It’s a good feeling to know that you can still play even after you have reached adulthood.
Originally posted 2015-03-15 18:32:08.
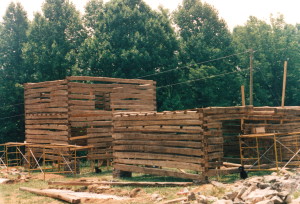
A double pen log barn… part 3
It was a double-pen log barn…
Which meant that she was composed of two separate log structures… one little log cabin built close to another, and then, both were covered with a single roof. The space in between the two pens became a breezeway where farm vehicles could easily enter and exit.
It’s a genius method of construction that enabled as few as two men to build a large barn. Country folks “back then” were a lot smarter than most people give them credit for having.
I read recently where a poll revealed that one in four Americans today don’t know that the Earth orbits the Sun… now that is just sad. (It scares me for the future of democracy)
But anyway… back on topic…
All the logs in this barn are chestnut.
Most structures that are made out of chestnut were built in the 1930’s right after the chestnut blight wiped out all of those precious trees. All this newly dead wood flooded the market and became the building material of choice… it was abundant, easy to work, long lasting, and cheap.
Another benefit of chestnut is that it is light in weight, two men can lift any log found in this barn. If they had used oak, four men would have been required.
Today chestnut is very rare and highly sought after. It is only available through salvage and it is no longer cheap in price. It was a thrill for me to be surrounded by so much of it.
A final note with regard to this photo… notice our tags that are attached to each log. The individual logs were numbered carefully so that we could put this barn back up, just as she was.
Originally posted 2015-03-15 17:48:31.
A double pen log barn… part 2
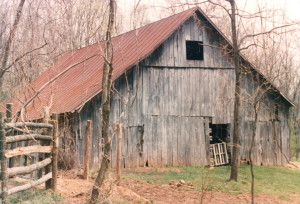
Step one on our journey to disassemble this barn was to remove the old barn siding… we do this very carefully… it’s always handy lumber to have around so we don’t want to waste it.
And then we remove the metal roofing. It is an easier process than you might imagine and one that we always find it quite “invigorating”.
We start at one of the top corners of the barn roof and with a digging bar we start to “unroll” the roofing. It’s the same sort of process as opening a can of sardines.
About the time that we are a third of the way across the roof of the barn the metal that we have rolled up has gained enough mass that it will unroll the rest of the roof on it’s own momentum and leave us with one big pile of metal on the ground.
It’s quite a thrilling moment when it happens, especially for the man on the roof. There is a lot of noise, and tremendous shaking, and all kinds of things flying in different directions. lol
It’s the same thrill as you get when you are on a roller coaster. You have committed yourself to something and then find you are no longer in control. And once it’s over, you want to do it again.
A track loader then rolls over the metal pile, folds it a couple of times, and then the recycler generally pays us enough for the old metal to buy everyone some refreshments at the end of the day.
Originally posted 2015-03-15 16:19:44.
A double pen log barn… part 1
I have visited, and explored, hundreds of old barns over the years.
I really have… hundreds of them.
And, I have loved them all.
There is nothing else quite like an old barn.
They are magical places. Full of sights and sounds, and yes, smells, that you simply won’t find anywhere else. Maybe it’s just me, or the fact that I have so many fond memories of exploring my grandparent’s barn as a child. I just feel more “connected” when a barn is near.
If you haven’t been in an old barn in a while (or heaven forbid, you have never been in one)… make it a priority to go visit one. You won’t regret it.
It is sad that these antique structures are disappearing so fast from our landscapes. They just aren’t needed like they used to be… the large round bales of hay, which are so common today, turned out to be the swan song of these relics.
I watched a tv show the other night where a young man called a barn a “cow house”. I guess we are heading into a future where even the word “barn” will only garner confused looks.
I have restored a few barns over the years… a couple of them now serve as locations for wedding receptions, another one offers square dance opportunities, and yet another serves as a museum for a modern art collection. Not a single one provides a roof over the head of a cow though.
I have also rebuilt quite a few old barns as homes or cabins for clients…some of them were timber frame, some were log… they do make mighty fine homes… no doubt about it.
But only once did I salvage a barn and have the privilege of putting it back up as a barn. It was incredible. I had a great time. I learned a few things too.
I look forward to sharing it all with you this coming week.
So, let’s build a barn!
Originally posted 2015-03-15 15:13:02.
Lost treasure
Years ago I received a call from someone who told me that they had an old farmhouse that had been the victim of a fire and he asked me if I’d be interested in salvaging the home.
The caller said that part of the home was an old log cabin.
He had my interest.
I made my usual mistake of asking some follow up questions… how old was the cabin? what species of wood was it made out of?
No one ever seems to know these answers… but almost everyone will respond with… “I heard it was built in the 1700’s… out of chestnut”. (For the record… I’ve never seen a log cabin from the 1700’s built out of chestnut, and I doubt if there is one)
The reason I ask for more information when someone calls is that 9 out of 10 times that I go look at a old building it turns out to be a wasted trip. As much as I love a good road trip, I’d rather spend my time building… or just hanging out with my family.
Driving to the other side of the state to look at a house or a barn can easily take my entire day.
I heard long ago that every successful door-to-door salesman rejoices with every rejection knowing that it’s all about the odds and that with each failure he is getting a little closer to that eventual prize. And, that is the attitude that I adopted with my adventures.
Even if the building I’m going to see doesn’t work out, I try my best to enjoy meeting this new person that is put in front of me, and savoring this new part of the state that I get to visit. I have seen more of the back roads of the old dominion than most, from the cotton fields of the southeast to the stone walls of the northwest… I do love Virginia… and the people that live here.
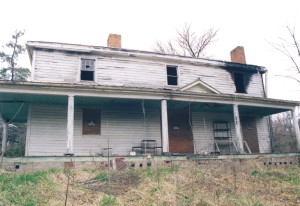
The first impression of this house (other than the charring visible outside of a second story window) was that she appeared to be a house out of 1920’s… “John Boy’s era”… “the greatest generation”… but certainly not the greatest period of Virginia architecture.
She was… a plain Jane.
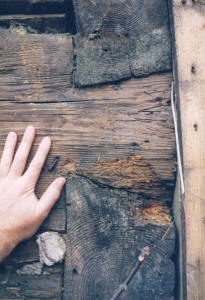
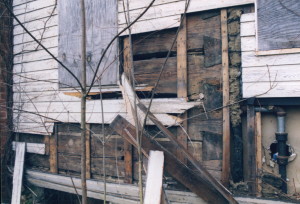
A journey around to the side of the house was a real treat though. The property’s owner had pulled away some of the siding to reveal a breathtakingly beautiful log cabin. Large logs, with full-dovetail notches, all heartpine. OMG
Heartpine log cabins are the most attractive cabins that you will ever see, but they are very rare. Most weren’t cared for and either rotted away or the bugs ate them up.
Full dovetail notching is also very rare. Mostly found in books and not in real life practice. They are overly complicated to produce and their very nature, of bringing moisture into a joint and causing it to rot out, kept most people from using them in the building of their home.
I wanted this cabin.
Until I walked inside.
The cabin only comprised one end of the entire home, clearly built during a much earlier period. This section of the home was where the fire had raged. The entire cabin’s interior had been charred… not just blackened… but burned away.
The only salvage value here would be to take the logs to a sawmill and see what lumber could be obtained by slicing her up. I didn’t have the heart for that. So, I gave the fellow a couple phone numbers of people that do that type of salvaging and walked away with these three photos and the lost dream of what could have been one mighty fine cabin.
Originally posted 2015-03-14 17:02:43.

